
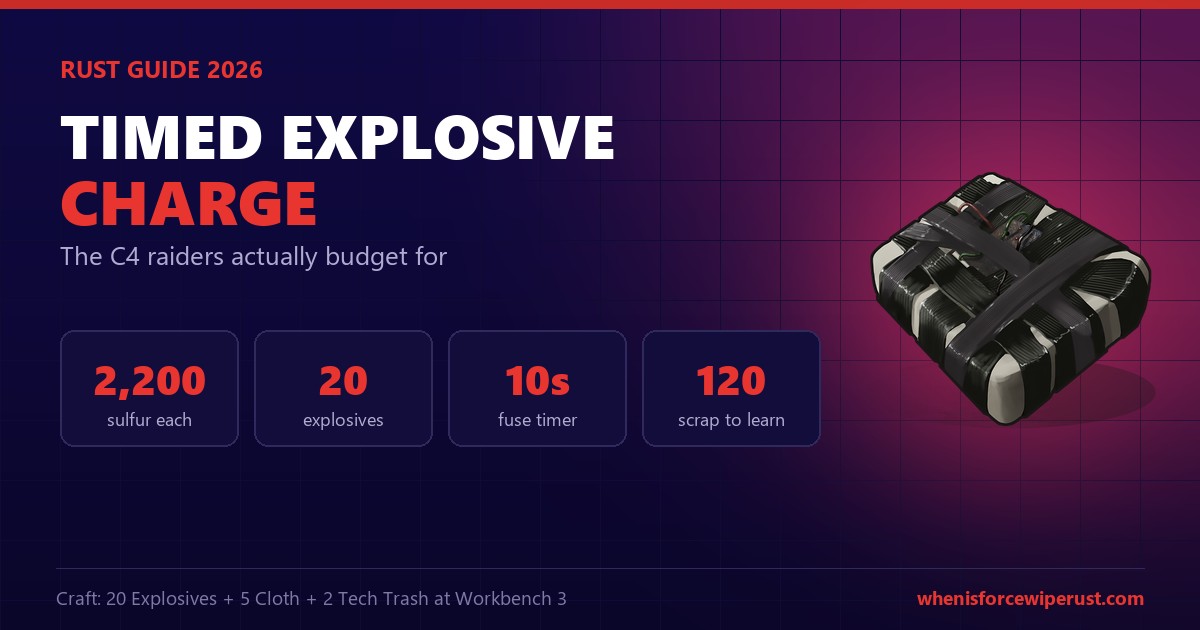
The Timed Explosive Charge is the item every Rust wipe is quietly building toward. Everyone calls it C4, everyone wants a stack of it by day three, and almost nobody does the maths on what it actually costs before they start farming. It is the cleanest way into a base in the game: one charge sticks to a wall, beeps for ten seconds, and takes a chunk out of anything short of an armored wall.
It is also the single most expensive thing you will ever craft. One charge burns 2,200 sulfur. That is not a typo, and it is why experienced raiders reach for satchels on doors and save the C4 for walls. This guide covers the full recipe, the real raw cost, how many charges every wall and door needs, when C4 is the wrong tool, and the RF trick most players have never used.
- What It Is
- Crafting Recipe
- Unlocking the Blueprint
- The Real Sulfur Cost
- How Many C4 Per Target
- C4 vs Rockets & Satchels
- How to Use It
- RF Detonation
- Finding C4 in Loot
- Recycling
- Myths & Mistakes
- Pro Tips
- FAQ
What Is the Timed Explosive Charge in Rust?
The Timed Explosive Charge is Rust’s premium breaching explosive, and the item the game files list under the shortname explosive.timed. Facepunch’s own description is four words long: C4, useful for breaking into bases. That is genuinely all it does, and it does it better than anything else in the game.
You throw it. It does not bounce. It sticks to the first surface it touches, whether that is a wall, a door, a floor or a deployable, then beeps for ten seconds and detonates. There is no aiming skill involved and no way to defuse it once the timer is running.
What makes it special is not raw damage, it is consistency. Rockets can be blocked by an overhang. Explosive ammo takes a full magazine and a lot of noise. A charge either sticks to the thing you want gone or it does not, and if it sticks, the damage is guaranteed. Against sheet metal and armored walls it is also the cheapest boom in the game per point of structure health, which is why it is the standard currency of serious raiding.
| Property | Value |
|---|---|
| Item shortname | explosive.timed |
| Stack size | 10 |
| Despawn time on the ground | 1 hour |
| Fuse timer | 10 seconds |
| Base damage | 550 |
| Workbench required | Level 3 |
| Craft time | 30 seconds |
| Repairable | No |
| Recyclable | Yes |
How to Craft a Timed Explosive Charge
The recipe itself is short. It is what sits underneath the recipe that costs you your wipe.
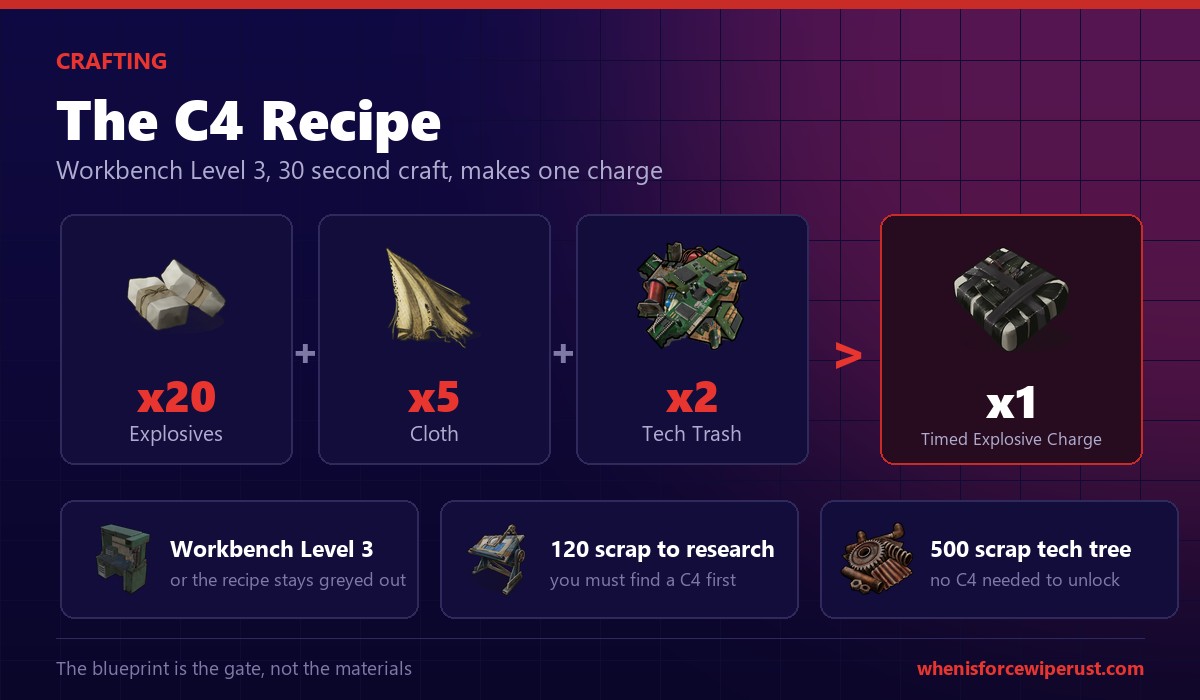
| Ingredient | Amount | Where It Comes From |
|---|---|---|
| Explosives | 20 | Crafted: 50 Gun Powder + 10 Sulfur + 10 Metal Fragments + 3 Low Grade Fuel each |
| Cloth | 5 | Hemp plants, or cactus and dropped loot |
| Tech Trash | 2 | Barrels, crates and recycled electronics |
The chain runs deeper than it looks. Twenty Explosives means 1,000 Gun Powder, and Gun Powder is itself a crafted item: 30 Charcoal and 20 Sulfur gives you 10. Every layer multiplies, which is how a three line recipe turns into a four figure sulfur bill.
You need a Workbench Level 3 in range or the recipe stays greyed out no matter how many materials you are holding. Craft time is 30 seconds per charge, so a stack of eight is four minutes of standing still. Start the queue before you go farm the rest, not after.
How to Unlock the C4 Blueprint
Having the materials means nothing without the blueprint, and this is where most players stall out. There are exactly two routes.
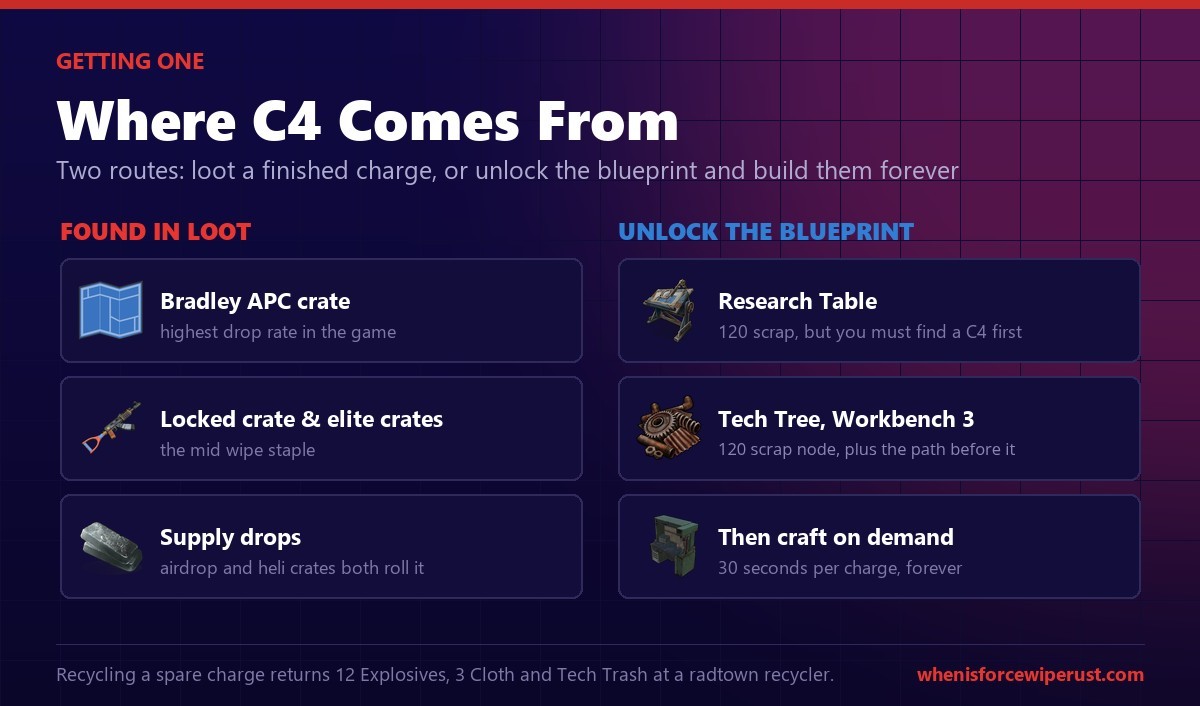
Research Table, 120 scrap. By far the cheaper option, with one catch: you have to physically find a Timed Explosive Charge first and spend it on the table. That means Bradley, a locked crate or an airdrop has to pay out before you can start. If a charge lands in your lap on day two, research it immediately rather than throwing it at a base. One wall is worth a lot less than an unlimited recipe.
Tech Tree at Workbench 3, 120 scrap. The node costs the same as research, but you also pay for every node before it. In return it is deterministic. You never need to find a charge, you just grind scrap and walk the tree. Because C4 sits behind the Explosives node, the full path from the start of the Tier 3 tree runs to roughly 720 scrap if you have unlocked nothing else along the way.
The Real Cost: 2,200 Sulfur Per Charge
Here is the number that should drive every raid decision you make.
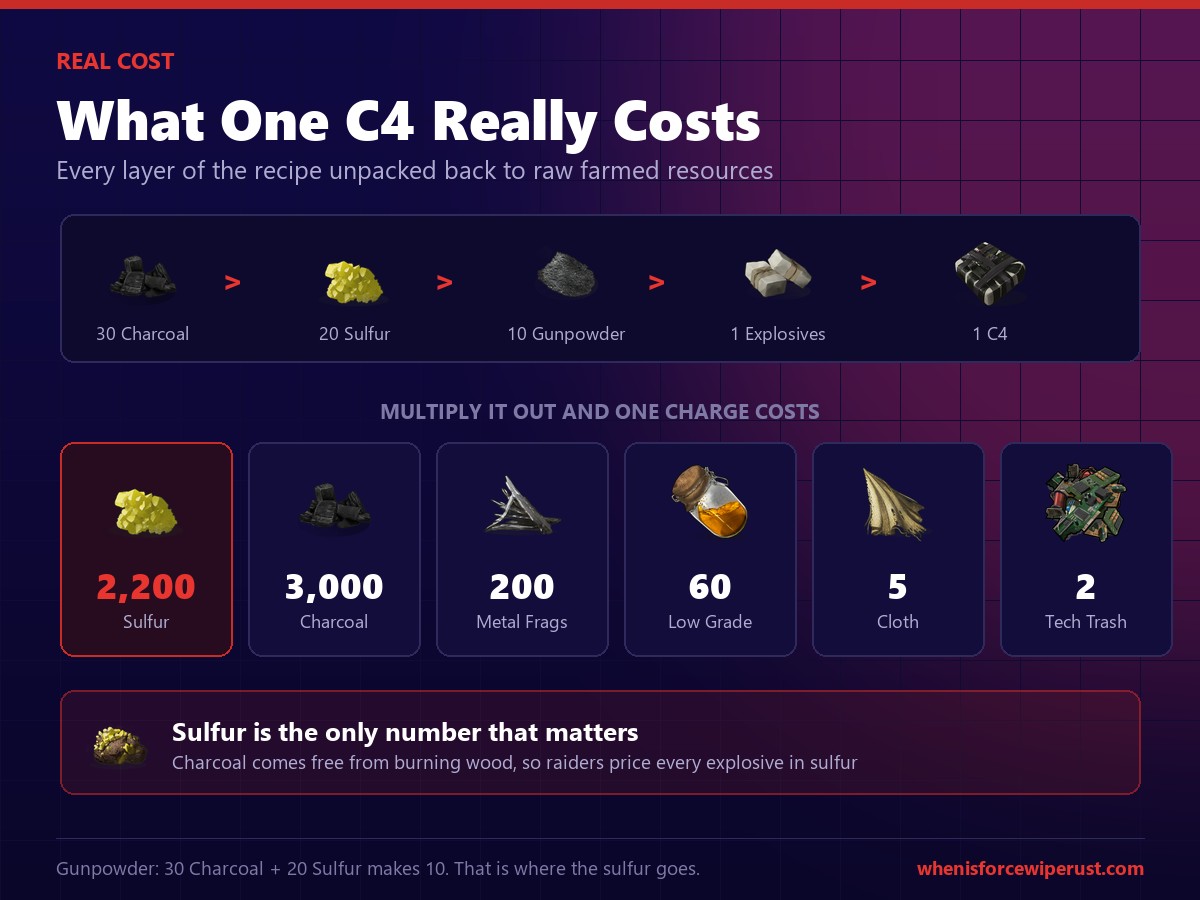
| Raw Resource | Per Charge | Why |
|---|---|---|
| Sulfur The bottleneck | 2,200 | 2,000 through Gun Powder, plus 200 direct into Explosives |
| Charcoal | 3,000 | Gun Powder only, and it is a byproduct of burning wood |
| Metal Fragments | 200 | 10 per Explosives |
| Low Grade Fuel | 60 | 3 per Explosives |
| Cloth | 5 | Direct into the charge |
| Tech Trash | 2 | Direct into the charge |
Only one of those numbers is worth tracking. Charcoal is free. It falls out of every furnace you run and most players are throwing it away by mid wipe. Metal fragments and low grade are trivially farmable. Cloth and tech trash are rounding errors.
Sulfur is the one that costs you hours. Sulfur nodes are contested, they are usually in the open, and 2,200 of it is a serious night of farming for a solo. This is exactly why the community prices every explosive in sulfur and nothing else, and why our Rust raid calculator outputs sulfur totals rather than item counts.
How Many C4 for Every Wall and Door
This is the table people actually come for. All values are vanilla.
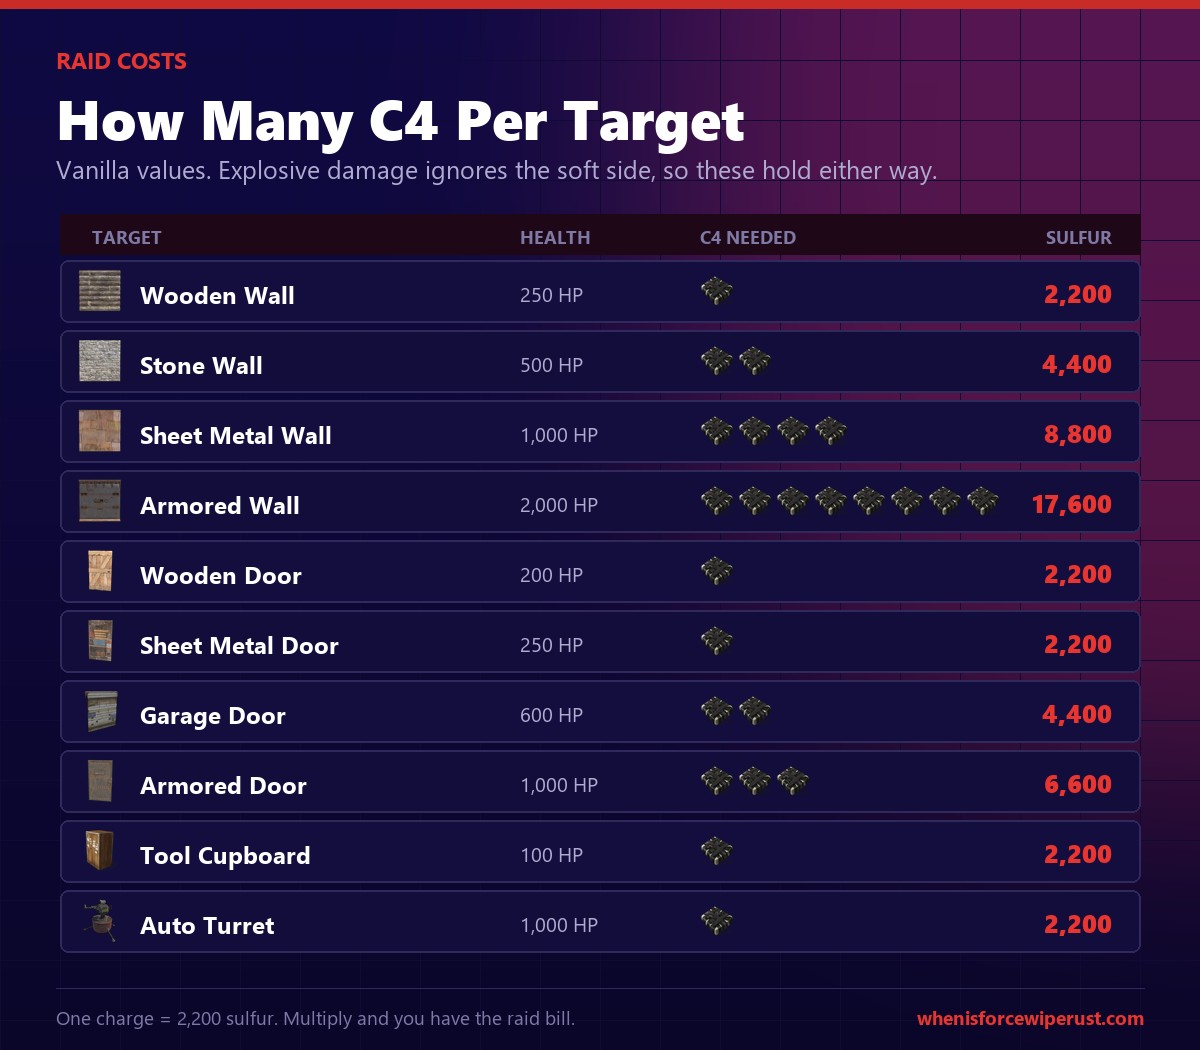
| Target | Health | C4 Needed | Sulfur Cost |
|---|---|---|---|
| Wooden Wall | 250 | 1 | 2,200 |
| Stone Wall | 500 | 2 | 4,400 |
| Sheet Metal Wall | 1,000 | 4 | 8,800 |
| Armored Wall | 2,000 | 8 | 17,600 |
| Wooden Door | 200 | 1 | 2,200 |
| Sheet Metal Door | 250 | 1 | 2,200 |
| Garage Door | 600 | 2 | 4,400 |
| Armored Door | 1,000 | 3 | 6,600 |
| High External Wooden Wall | 500 | 2 | 4,400 |
| High External Stone Wall | 500 | 2 | 4,400 |
| Ladder Hatch | 250 | 1 | 2,200 |
| Metal Window Bars | 500 | 2 | 4,400 |
| Tool Cupboard | 100 | 1 | 2,200 |
| Auto Turret | 1,000 | 1 | 2,200 |
Two things stand out. First, the jump from sheet metal to armored is brutal: the wall only doubles in health but the charge count doubles too, taking you from 8,800 to 17,600 sulfur for a single tile. Second, a tool cupboard dies to one charge. If you can reach the TC through a window or a hatch rather than through three walls, you have just saved yourself six charges.
C4 vs Rockets, Satchels and Explosive Ammo
The Timed Explosive Charge is the most powerful explosive per item, and that is not the same as being the most efficient. Priced in sulfur, C4 is 2,200, a rocket is 1,400, a satchel is 480 and a single explosive 5.56 round is 25.
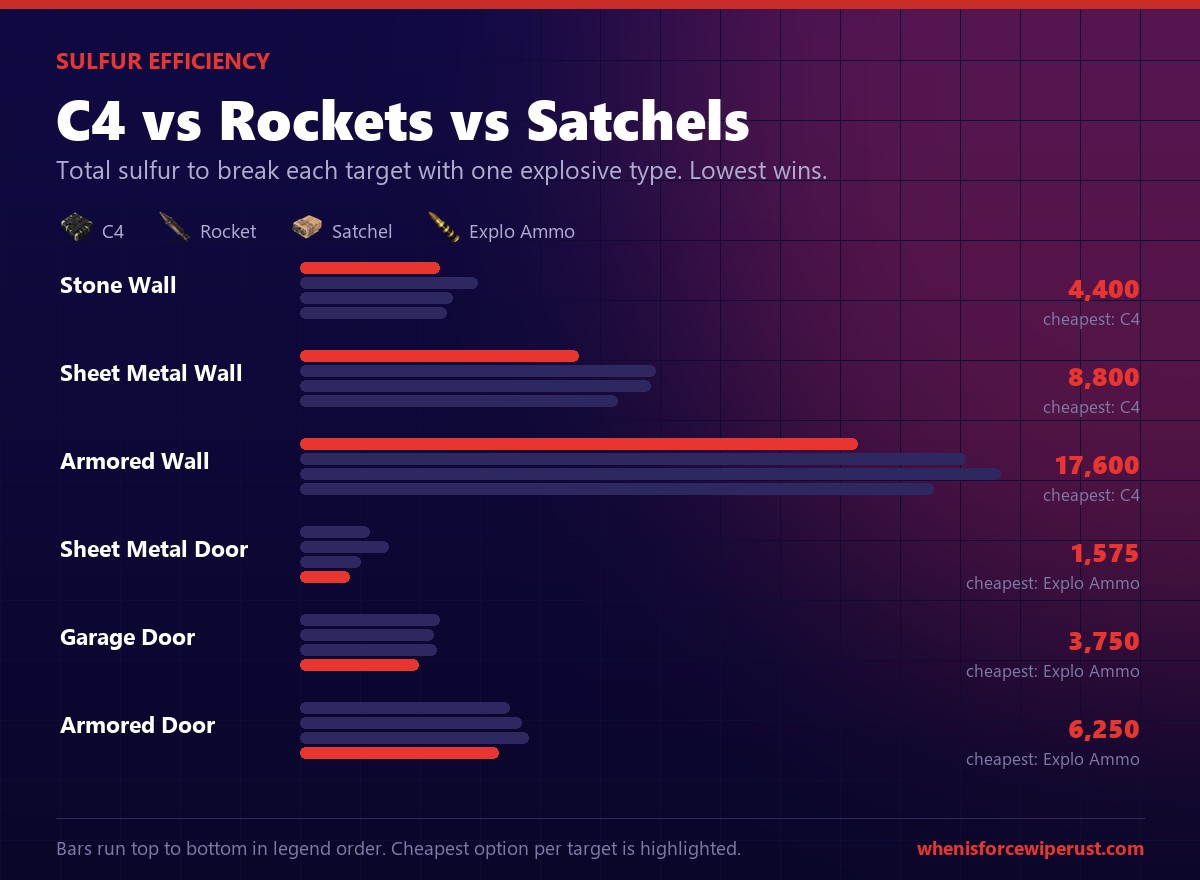
| Target | C4 | Rockets | Satchels | Explosive Ammo | Cheapest |
|---|---|---|---|---|---|
| Stone Wall | 2 (4,400) | 4 (5,600) | 10 (4,800) | 185 (4,625) | C4 |
| Sheet Metal Wall | 4 (8,800) | 8 (11,200) | 23 (11,040) | 400 (10,000) | C4 |
| Armored Wall | 8 (17,600) | 15 (21,000) | 46 (22,080) | 799 (19,975) | C4 |
| Sheet Metal Door | 1 (2,200) | 2 (2,800) | 4 (1,920) | 63 (1,575) | Explosive ammo |
| Garage Door | 2 (4,400) | 3 (4,200) | 9 (4,320) | 150 (3,750) | Explosive ammo |
| Armored Door | 3 (6,600) | 5 (7,000) | 15 (7,200) | 250 (6,250) | Explosive ammo |
The pattern is clean: C4 for walls, cheaper explosives for doors. Every wall tier is won by C4, and every door is won by explosive ammo or satchels. Blowing a sheet metal door with a charge costs 2,200 sulfur when 1,575 of explosive 5.56 does the same job.
That said, sulfur is not the only currency. Explosive ammo needs a rifle, a lot of time on target, and it is loud for a long stretch. Satchels have a genuine dud rate and a habit of bouncing back at you. C4 is instant, silent to place and impossible to fumble, and on an online raid where speed decides everything, paying 600 extra sulfur to be through a door in twelve seconds is often the correct call. Run the numbers for your actual target with the raid calculator before you commit.
How to Use C4 in Rust
Mechanically it could not be simpler, but the sequencing is where raids are won or lost.
- Equip the charge in your hotbar and hold left click to wind up the throw.
- Aim at the surface you want gone. It sticks to whatever it hits first, so watch for door frames, deployables and window bars soaking your charge.
- Release. The charge attaches, arms itself and starts beeping.
- You have 10 seconds. Place every other charge for that wall now, then get behind cover.
- All charges on the same wall detonate on their own timers, so stack them fast and they land together.
Place them all before the first one blows. This is the single biggest efficiency gain available. If a stone wall needs two charges, throw both inside the first two seconds. Throwing one, waiting for it to detonate, then throwing the second means the second charge hits a damaged wall for the same cost, which is fine, but it also gives the defender ten extra seconds to reach a turret or log in a teammate.
Worth knowing on the defensive side: a Seismic Sensor picks up a C4 detonation at vibration level 3, so a well wired base will know the moment your first charge goes off even if nobody is watching. Assume the clock starts on your first bang, not your first sighting.
RF Detonation: The Mode Most Players Ignore
Since the March 2023 update every Timed Explosive Charge can run on a radio frequency instead of its timer, and most players still have no idea.
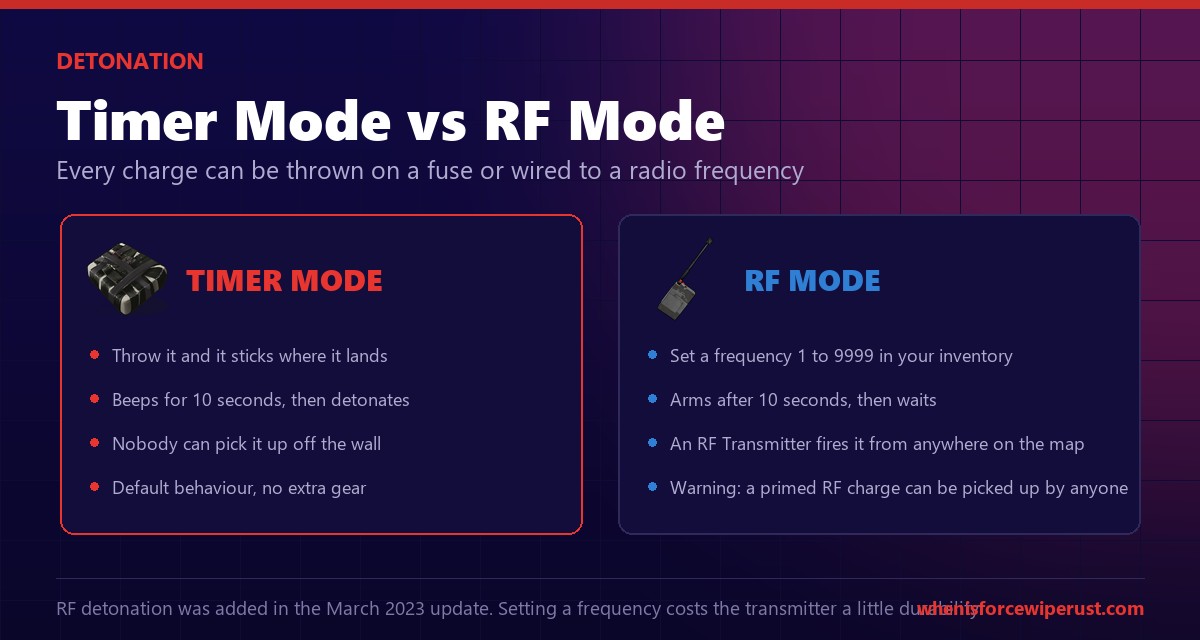
Open your inventory, click the charge, toggle RF on and set a frequency between 1 and 9999. Throw it exactly as normal. It still beeps for ten seconds while it arms, but at the end of that countdown it simply sits there with a green light instead of exploding. An RF Transmitter in your hand or an RF Broadcaster deployed in your base, set to the same frequency, detonates it. Every charge on that frequency goes at once, from anywhere on the map.
That opens up things the timer cannot do. You can pre place charges on a target’s walls hours before you raid and set them off when their whole team is offline. You can rig a doorway as a trap. You can wire a broadcaster to a switch and blow your own loot room rather than let it be taken.
Where to Find C4 in Loot
You do not have to craft every charge. Finished C4 spawns in the highest tier containers in the game, and the drop rates are better than most players assume.
| Source | Rough Drop Chance | Notes |
|---|---|---|
| Bradley APC crate Best odds | ~36% | Bradley drops several crates, so one kill often pays multiple charges |
| Supply drop | ~27% | Airdrops and called drops both roll it |
| Elite crate, heli | ~25% | Patrol Helicopter crates, once the fire burns out |
| Elite crates | Lower | Behind red keycard doors at Military Tunnels, Launch Site and Large Oil Rig |
| Locked crate | Lower | The hackable crate on Oil Rig and at monuments |
Bradley is the standout. If you have the rockets and an assault rifle to clear the crates, killing Bradley is consistently the fastest way to turn mid tier gear into raiding material. The keycard monuments are the other reliable route, which is why the blue keycard chain feeds directly into your raiding economy rather than sitting to one side of it.
Recycling a Timed Explosive Charge
Spare charges are not dead weight. If you end a wipe with C4 you were never going to spend, or you loot a single charge and have no Workbench 3, a recycler turns it back into usable components.
| Recycler | Explosives | Cloth | Tech Trash |
|---|---|---|---|
| Radtown recycler Better | 12 | 3 | 1, plus 20% chance of a second |
| Safe zone recycler | 8 | 2 | 80% chance of 1 |
Note the gap. A radtown recycler returns 12 of the 20 Explosives you put in, against 8 at Outpost or Bandit Camp. That is a 50% better return for walking to a monument recycler instead of a safe zone one. If you are recycling anything valuable, it is worth the trip.
Myths and Common Mistakes
Myth: you need the soft side for C4. You do not. Explosives deal identical damage to both faces of a structure. The soft side rule applies to guns and melee, and repeating it about C4 wastes raid time.
Myth: C4 is always the best explosive. It is the best per item and the worst per sulfur on doors. Anyone C4ing a sheet metal door is burning 40% more sulfur than they need to.
Myth: the C4 blueprint costs 500 scrap. That figure gets repeated a lot, but it is the old price from before the November 2025 update cut blueprint costs. Researching a found charge is 120 scrap, which is one of the best value unlocks in the game.
Mistake: crafting charges without a Workbench 3 nearby. The materials will sit in your inventory and the recipe will stay greyed out. Confirm the bench before you haul 2,200 sulfur across the map.
Mistake: throwing charges one at a time. Ten seconds is a long window for a defender. Place everything for a given wall inside the first few seconds.
Mistake: raiding with exactly enough C4. Something always eats a charge you did not plan for: a window bar, a misthrow, an extra airlock door. Carry at least one spare or accept that you will be standing in someone’s half open base with nothing to finish it.
Pro Tips for Raiding with C4
- Research before you raid. A looted charge is worth far more as a 120 scrap blueprint than as one hole in a wall.
- Go for the tool cupboard, not the loot room. The TC dies to a single charge and taking it means you can build inside their base and stop them repairing.
- Mix your explosives. C4 the walls, satchel or explosive ammo the doors. A mixed raid on the same base can easily save 20% of the sulfur bill.
- Watch for window bars. Metal window bars soak a full charge for 500 health. Check the wall you are about to hit for anything the charge will stick to instead.
- Farm charcoal on purpose. Most players run furnaces at a wood deficit and end up short on charcoal for gunpowder. Three thousand charcoal per charge adds up fast.
- Use RF for offline raids. Pre placing on a frequency and detonating later is genuinely powerful, just never leave charges sitting where an online defender will find and pocket them.
- Time it around the wipe. Nobody has C4 on day one and nobody has anything worth taking on day fourteen. Mid wipe is when a raid pays for itself.
Planning a raid? Every stack of C4 you farm dies with the map. Check the live force wipe countdown before you sink 17,600 sulfur into a target.
Force Wipe CountdownTimed Explosive Charge FAQ
How do you craft a Timed Explosive Charge in Rust?
How much sulfur does one C4 cost in Rust?
How many C4 do you need for a stone wall?
How many C4 for a sheet metal wall and an armored wall?
How many C4 for a garage door in Rust?
How many C4 for an armored door?
How much damage does C4 do in Rust?
How long is the C4 timer in Rust?
Can you pick up a C4 after throwing it?
What workbench do you need for C4 in Rust?
Where do you find C4 in Rust?
Does the soft side matter for C4?
Is C4 better than rockets in Rust?
What do you get for recycling a Timed Explosive Charge?
Do Timed Explosive Charges survive a wipe?
Final Thoughts
The Timed Explosive Charge is not complicated, it is just expensive. Twenty Explosives, five Cloth, two Tech Trash and a Workbench 3 gets you a charge. Two thousand two hundred sulfur is what it really costs, and that number should decide whether a target is worth hitting long before you throw anything.
Get the blueprint cheap by researching the first charge you find rather than spending it. Use C4 on walls and something cheaper on doors. Place every charge for a wall before the first one blows. Do that and C4 stops being the thing you hoard all wipe and starts being the thing that pays for itself.
Sources
- Recipe, blueprint costs, stack size, despawn and recycler output: Facepunch Wiki, Timed Explosive Charge
- Item data, loot table drop rates and seismic sensor value: RustHelp, Timed Explosive Charge and RustHelp, Explosives
- Explosive damage applying equally to hard and soft sides: Rustafied, Raiding in Rust
- RF detonation mechanics and the pickup caveat: Rustafied, It’s RF Time
- Throw behaviour and the 10 second fuse: Corrosion Hour, Timed Explosive Charge
- Raid quantities cross checked against our own Rust raid calculator
- The game itself: Facepunch Studios