
The satchel charge is the first real raiding tool most players ever hold. It costs 480 sulfur, it unlocks at a Workbench Level 1, and it is the only explosive in Rust you can realistically afford on day two of a wipe. It is also the least reliable thing in the game, and it will absolutely refuse to detonate at the exact moment you need it to.
That combination is why satchels get such a mixed reputation. Half the server swears by them and half the server calls them a scam. Both groups are right, because a satchel charge is brilliant against doors and genuinely terrible against walls, and most players never learn which is which. This guide covers the full crafting chain, the honest raid chart for every structure, how satchels stack up against C4 and rockets on price, and what to do when one sticks to a wall and just sits there.
- What It Is
- Crafting Cost
- Getting the Blueprint
- Raid Chart
- Common Targets
- Satchel vs C4
- How to Use One
- The Dud Problem
- Myths & Mistakes
- Pro Tips
- FAQ
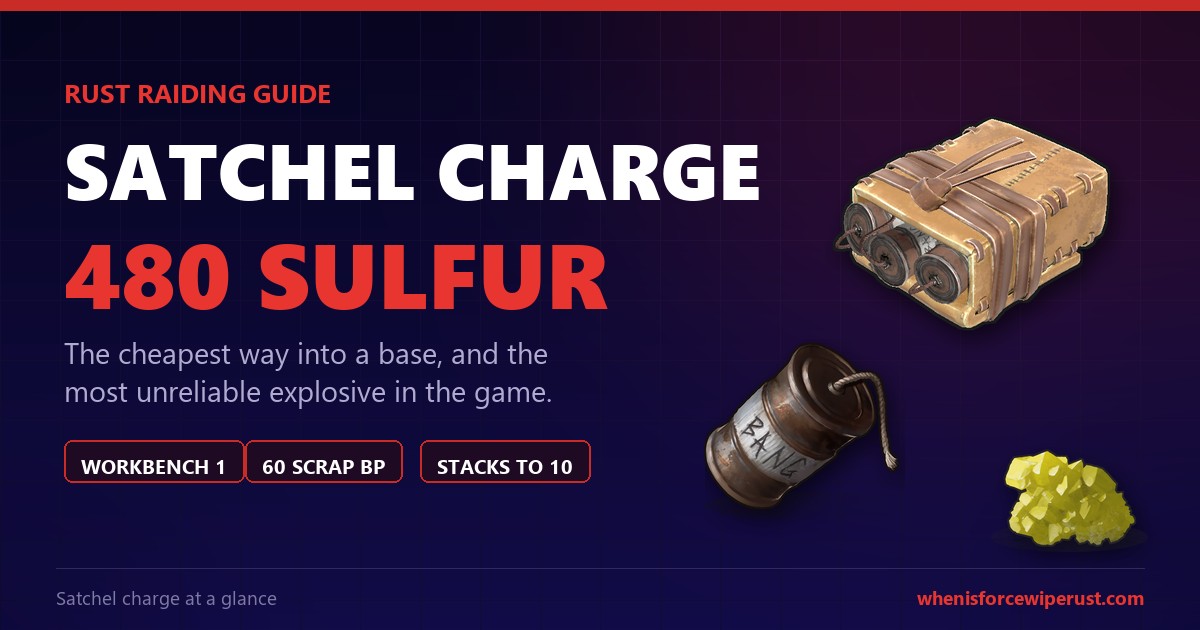
What Is a Satchel Charge in Rust?
A satchel charge is a thrown explosive built out of four beancan grenades lashed to a small stash with a length of rope. The game describes it as a small explosive package useful for destroying wood and sheet metal doors, which is unusually honest for an item description. That is exactly what it is for.
You throw it, it sticks to whatever it hits, a fuse burns, and it explodes. There is no arming sequence like C4 and no launcher to carry like a rocket. That simplicity is the whole appeal: satchels are the raiding tool you can use before you have a Workbench 2, before you have found tech trash, and before anyone on the server has a proper base.
The trade off is reliability. Beancan grenades are described in game as unreliable explosives with random fuse lengths, and strapping four of them together does not fix that. A satchel charge has a real chance of being a dud, which means it sticks to the wall, fizzles, and does nothing at all until you go and pick it up. More on that below, because it is the single most important mechanic in this guide.
Satchels stack to 10, which is double C4’s stack of five. A dropped satchel despawns after about 40 minutes. They are also detected by Seismic Sensors at vibration level 2, so a well defended base may know you are coming.
Rust Satchel Charge Crafting Cost
The recipe on the crafting screen looks cheap. The real bill is hidden two steps down, because beancan grenades are made of gun powder and gun powder is made of sulfur.
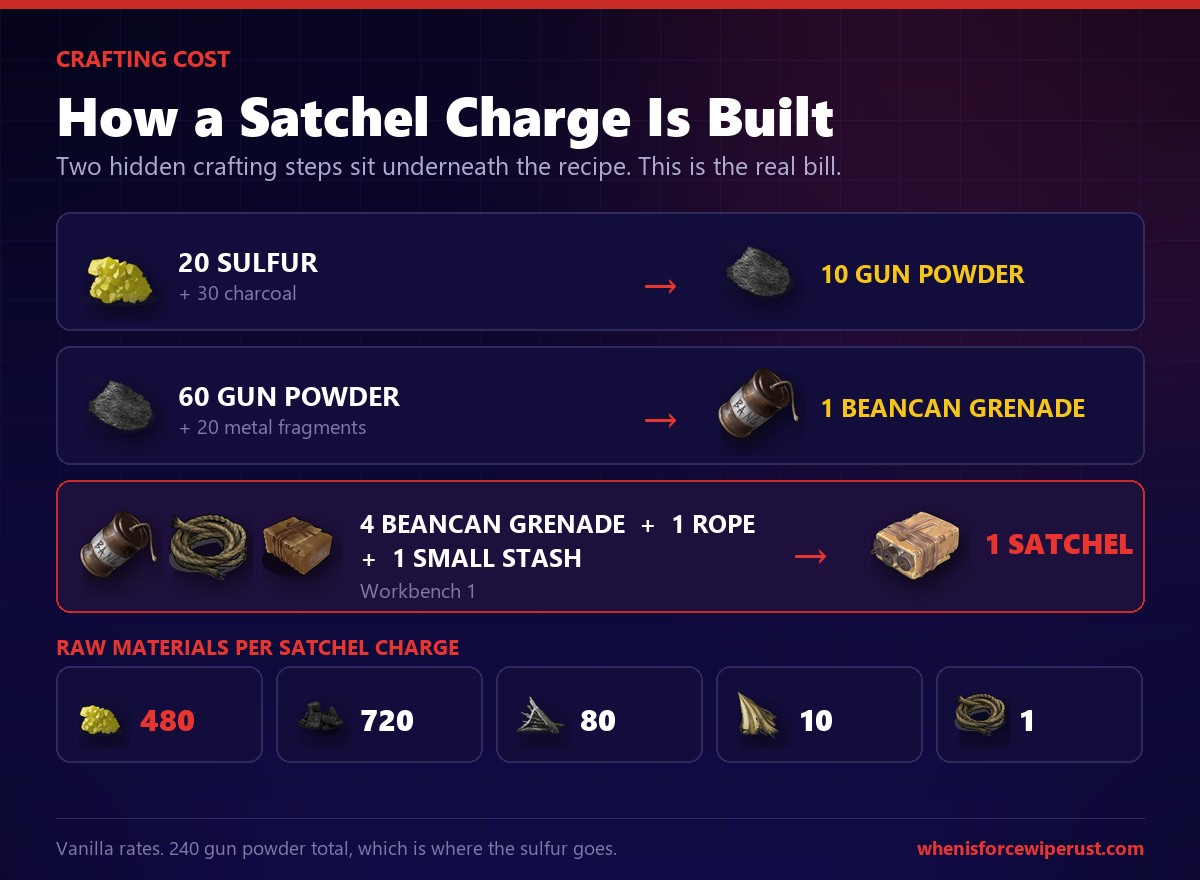
The recipe: 4 Beancan Grenade, 1 Rope and 1 Small Stash, at a Workbench Level 1. It takes 5 seconds to craft.
Each beancan grenade needs 60 Gun Powder and 20 Metal Fragments, so one satchel burns 240 gun powder in total. At 20 sulfur and 30 charcoal per 10 gun powder, that works out to 480 sulfur and 720 charcoal before you have touched the rope or the stash.
| Raw Material | Per Satchel | Where It Comes From |
|---|---|---|
| Sulfur The bottleneck | 480 | Sulfur nodes, mining quarries, sulfur ore in barrels |
| Charcoal | 720 | Burning wood in a furnace or campfire |
| Metal Fragments | 80 | Smelted metal ore |
| Cloth | 10 | Hemp plants, for the small stash |
| Rope | 1 | Loot component from barrels and crates |
Rope is the sneaky one. It is not craftable, so every satchel you make is gated behind a component you can only find in barrels, crates and roadside loot. Players who farm 10,000 sulfur and then discover they have two rope are a wipe day cliche. Loot barrels while you farm and you will never notice the problem.
How to Get the Satchel Charge Blueprint
Satchels are not a default recipe, but they are one of the easiest blueprints in the game to unlock, and there are two routes.
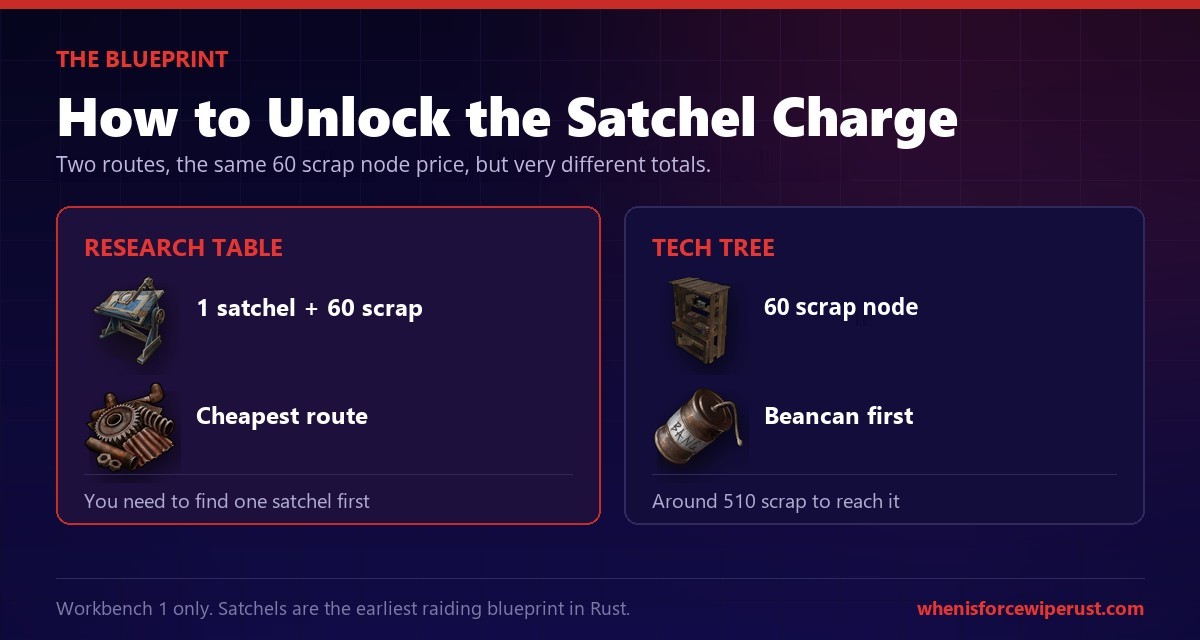
Research table. Drop one satchel charge into a research table with 60 scrap and the blueprint is yours for the wipe. This is the cheap route by a mile. The catch is the same as always: you need to find a satchel first, and they are not common loot.
Tech tree. The satchel charge node itself costs 60 scrap on the Workbench Level 1 tech tree, the same as researching it. That number gets quoted a lot and it is misleading on its own, because you cannot buy a node without owning the ones before it. Counting the beancan grenade and the other prerequisites on the path, expect to spend around 510 scrap in total to reach it from scratch.
Even at 510 scrap the tech tree is worth it, because it is guaranteed. Workbench 1 is cheap, the path is short compared to anything at Workbench 3, and it does not depend on getting lucky in a crate. For most solo players, teching to satchels is the first genuine raiding capability of the wipe.
How Many Satchels for Each Structure
This is the table people come for. All values are vanilla, against undamaged structures, with nobody repairing mid raid. Unlike guns and melee, explosives ignore the soft side and hard side distinction, so it does not matter which face you attack.
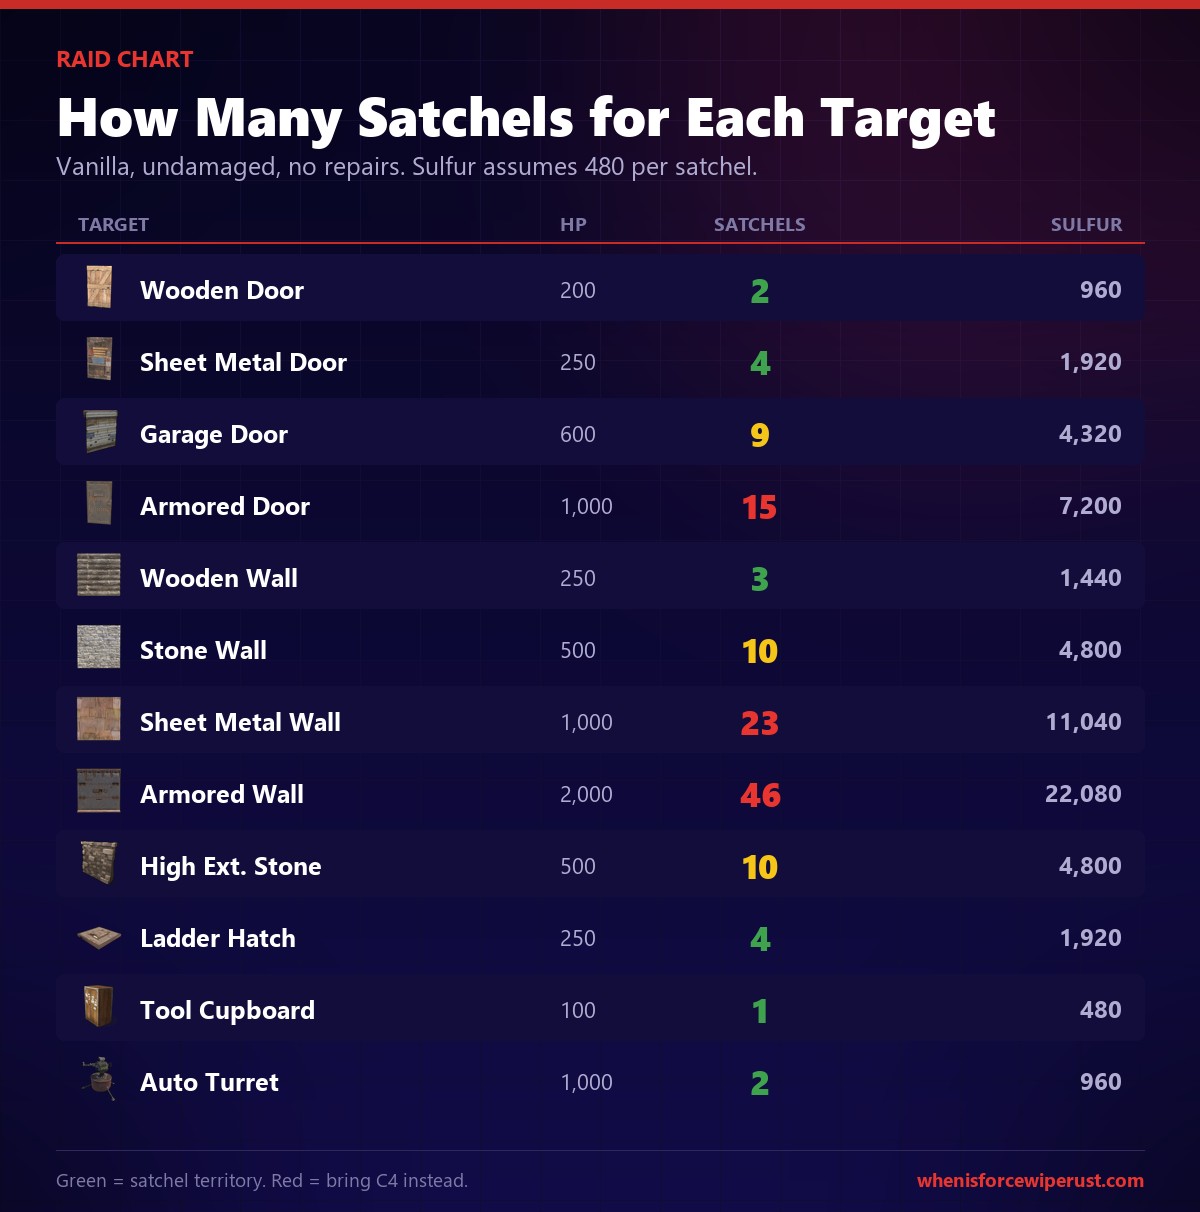
| Target | HP | Satchels | Sulfur Cost |
|---|---|---|---|
| Wooden Door Best value | 200 | 2 | 960 |
| Sheet Metal Door Best value | 250 | 4 | 1,920 |
| Garage Door | 600 | 9 | 4,320 |
| Armored Door | 1,000 | 15 | 7,200 |
| Wooden Wall | 250 | 3 | 1,440 |
| Stone Wall | 500 | 10 | 4,800 |
| Sheet Metal Wall | 1,000 | 23 | 11,040 |
| Armored Wall | 2,000 | 46 | 22,080 |
| High External Wooden Wall | 500 | 6 | 2,880 |
| High External Stone Wall | 500 | 10 | 4,800 |
| Ladder Hatch | 250 | 4 | 1,920 |
| Metal Window Bars | 500 | 12 | 5,760 |
| Tool Cupboard Best value | 100 | 1 | 480 |
| Auto Turret Best value | 1,000 | 2 | 960 |
Read that table once and the strategy writes itself. Doors and deployables are cheap. Walls are not. A sheet metal door costs 4 satchels while the sheet metal wall right next to it costs 23. That is a 9,120 sulfur difference for moving your aim two feet to the left.
The armored wall line is there for completeness only. Forty six satchels is 22,080 sulfur, which is not a raid plan, it is a hostage situation. If you hit armored, stop and find another way in.
Satchel Counts for the Targets People Actually Ask About
How Many Satchels for a Stone Wall?
Ten satchels, which is 4,800 sulfur for a 500 HP stone wall. Two C4 does the same job for 4,400 sulfur, so C4 is very slightly cheaper and enormously faster. If you already have C4, use it. If you are a solo on day three with no Workbench 3 in sight, ten satchels is a perfectly real answer and it is the reason satchels exist.
Better still, look for a door. Stone walls almost always have a wooden or sheet metal door somewhere nearby that costs a quarter as much to open.
How Many Satchels for a Sheet Metal Door?
Four satchels, or 1,920 sulfur, against 250 HP. This is the single best use of a satchel charge in the entire game. One C4 costs 2,200 sulfur to do the same thing, so satchels genuinely beat C4 on price here, and the sheet metal door is the most common door in Rust by a wide margin.
Four satchels is also small enough to carry comfortably. Half a stack opens the most common door in the game, which is why experienced raiders keep satchels around long after they can afford rockets.
How Many Satchels for a Garage Door?
Nine satchels, which is 4,320 sulfur against 600 HP. That narrowly beats two C4 at 4,400 sulfur and three rockets at 4,200. The garage door is right on the boundary where satchels stop being obviously correct, so use whatever you have more of.
How Many Satchels for an Armored Door?
Fifteen satchels, or 7,200 sulfur. Three C4 does it for 6,600. At this tier satchels have lost their edge, and carrying fifteen of anything into a raid is asking for something to go wrong. Armored doors are where you should already have moved on to C4.
How Many Satchels for an Auto Turret?
Two satchels, which is 960 sulfur. This is the most underrated number in this guide. An auto turret has 1,000 HP but very little explosive resistance, so two satchels strip it for less than half the price of one C4 and a sixth the price of raiding it with rockets. If a base has external turrets, satchel them first.
Satchel vs C4 vs Rocket vs Explosive Ammo
Here is where satchels earn their reputation back. Per unit they are the cheapest craftable explosive in Rust at 480 sulfur, against 1,400 for a rocket and 2,200 for C4.
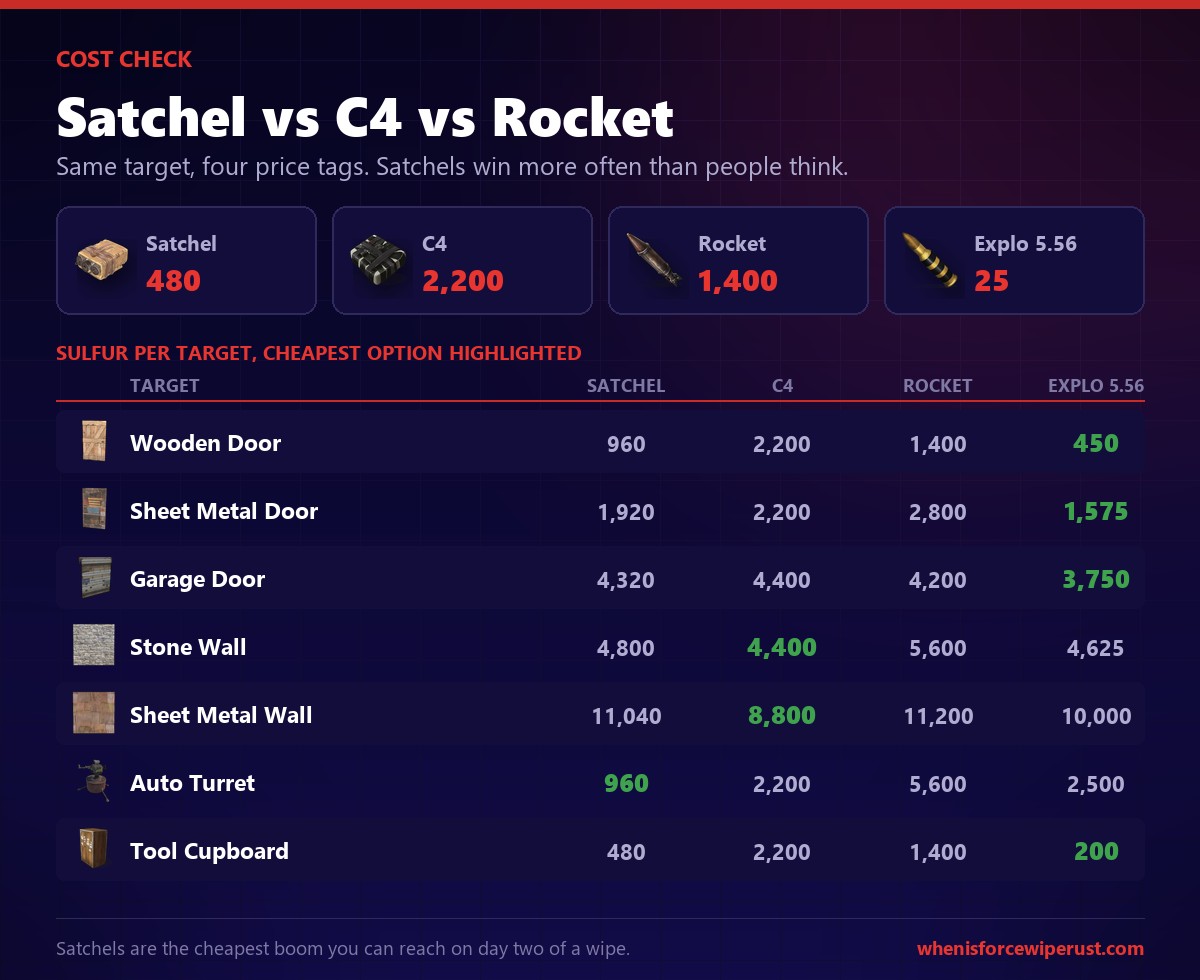
| Target | Satchels | C4 | Rockets | Explo 5.56 |
|---|---|---|---|---|
| Wooden Door | 2 (960) | 1 (2,200) | 1 (1,400) | 18 (450) |
| Sheet Metal Door | 4 (1,920) | 1 (2,200) | 2 (2,800) | 63 (1,575) |
| Garage Door | 9 (4,320) | 2 (4,400) | 3 (4,200) | 150 (3,750) |
| Armored Door | 15 (7,200) | 3 (6,600) | 5 (7,000) | 250 (6,250) |
| Stone Wall | 10 (4,800) | 2 (4,400) | 4 (5,600) | 185 (4,625) |
| Sheet Metal Wall | 23 (11,040) | 4 (8,800) | 8 (11,200) | 400 (10,000) |
| Auto Turret | 2 (960) | 1 (2,200) | 4 (5,600) | 100 (2,500) |
| Tool Cupboard | 1 (480) | 1 (2,200) | 1 (1,400) | 8 (200) |
Explosive 5.56 is technically the cheapest option on most doors, but it needs an assault rifle, a lot of patience, and a very loud few minutes standing still. Satchels are the practical cheap option.
The real argument for satchels is not the sulfur column at all. It is the workbench level. C4 needs a Workbench 3, tech trash and 2,200 sulfur per charge. Rockets need a Workbench 3 and a launcher on top. Satchels need a Workbench 1 and some hemp. On day two of a wipe there is no comparison, because the other two options do not exist yet.
How to Use a Satchel Charge
Satchels are thrown, not placed, and that changes how you approach a raid.
- Equip and hold left click. Holding the button lights the fuse and starts the throw. There is no separate arm step like C4.
- Throw it at the target. The satchel sticks to whatever surface it lands on. Aim at the middle of a door rather than the frame, because a satchel that bounces off is a satchel that damages nothing.
- Get behind something. The blast radius is large and it will happily kill you. Round a corner or put a wall between you and the charge.
- Throw the rest immediately. Do not wait for each one to detonate. Stick all four on a sheet metal door in sequence and let them go off together.
- Check for duds before you re throw. If a satchel is still sitting on the wall after the smoke clears, it did not fire. See the next section.
The noise matters more than most guides admit. Satchels are loud, and unlike C4 they take several throws to open a single door. That means a longer, louder window where the whole neighbourhood knows exactly which base is being hit. On a busy server, satchel raids attract company.
The Dud Problem, and How to Fix It
This is the mechanic that separates people who like satchels from people who hate them, and it is entirely learnable.
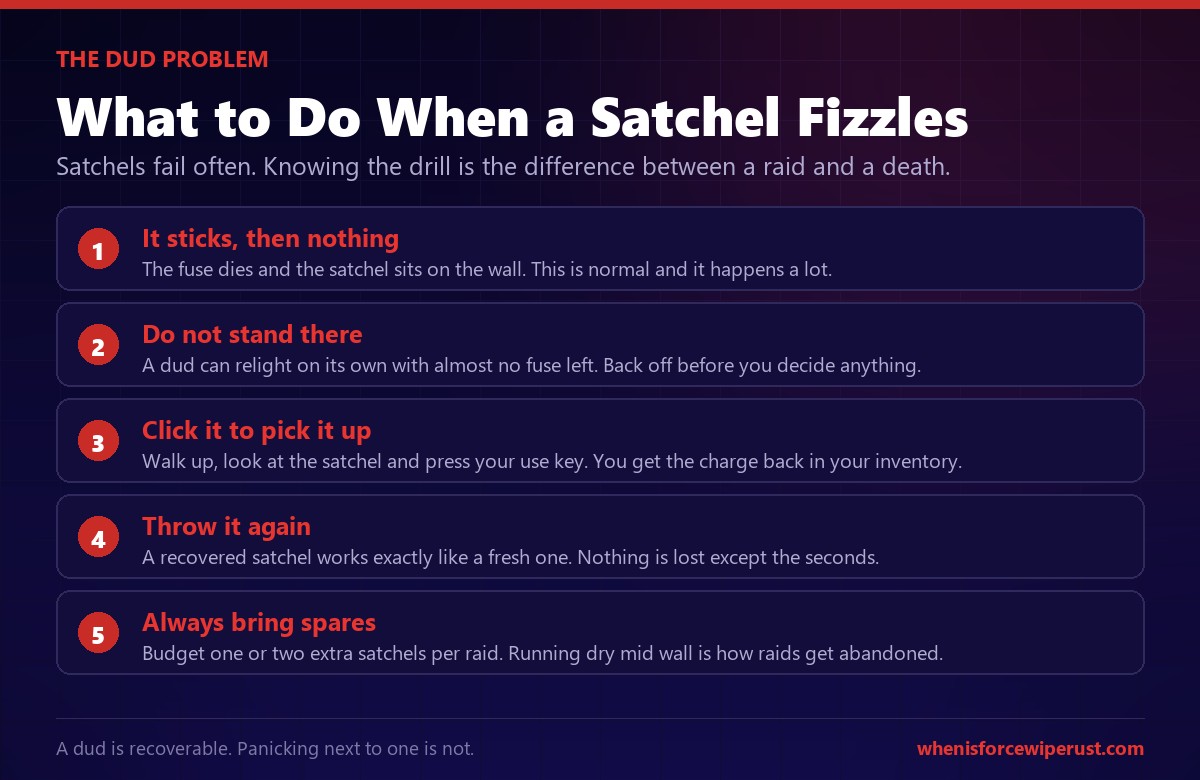
A satchel charge has a meaningful chance of being a dud. The fuse dies, the charge sticks to the wall, and nothing happens. This is not a bug and it is not bad luck, it is the item working as designed, because beancan grenades have random fuse lengths and a satchel is four of them.
The fix is simple. Walk up to the stuck satchel, look at it, and press your use key. You pick the charge back up into your inventory, and it works exactly like a fresh one when you throw it again. Nothing is wasted except time.
The danger is also simple. A dud can relight on its own, and when it does the remaining fuse is often almost nothing. Never sprint straight up to a fizzled satchel. Give it a couple of seconds from behind cover, then approach.
Satchel Myths and Common Mistakes
Myth: a dud satchel is wasted. It is not. Pick it up with your use key and throw it again. The only thing you lose is the seconds it took.
Myth: satchels are always the cheapest raid. They are the cheapest per charge, not per target. On stone and sheet metal walls, C4 costs less sulfur overall despite being four times the unit price.
Myth: the soft side matters for satchels. It does not. Explosives deal the same damage to hard and soft faces. Soft side only affects guns and melee weapons.
Myth: you need a Workbench 2 for satchels. Workbench 1 is enough for both the beancan grenades and the satchel itself.
Mistake: satcheling walls instead of doors. The most expensive habit in this guide. Twenty three satchels for a sheet metal wall versus four for the door beside it.
Mistake: forgetting rope. Rope is not craftable and every satchel needs one. Farm barrels alongside sulfur or your raid stops at the crafting screen.
Mistake: throwing one at a time. Stick all the satchels a target needs before the first one detonates. Feeding them in one by one doubles your time on target for no benefit.
Mistake: ignoring turrets. Two satchels kill an auto turret. Players routinely bring rockets for this and spend six times as much sulfur.
Stockpiling sulfur for a satchel raid? Every charge you have not thrown turns to dust when the map resets. Check the live force wipe countdown before you commit a wipe’s worth of farming.
Force Wipe CountdownPro Tips for Satchel Raids
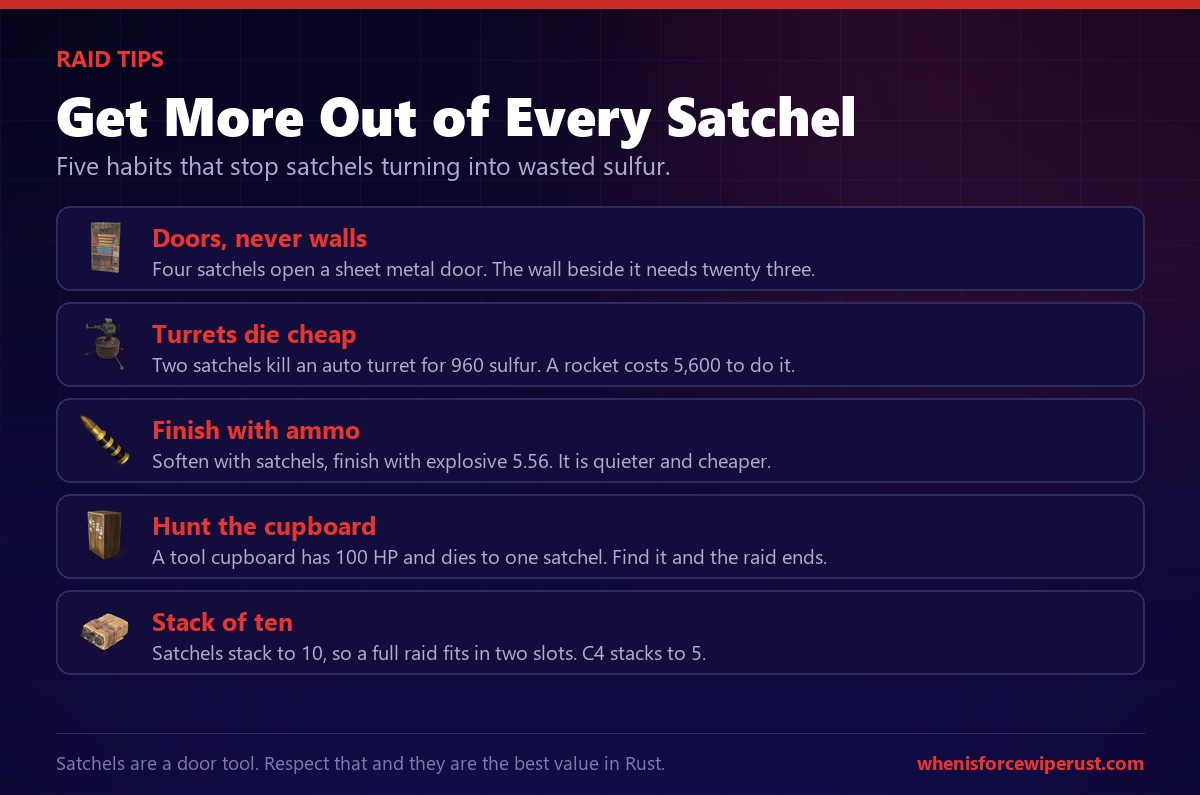
- Follow the doors. Every raid you plan with satchels should be a sequence of doorways, not a hole through a wall. If the path forward is stone, you brought the wrong explosive.
- Kill turrets first. 960 sulfur removes a turret. Doing this before anyone notices you makes the rest of the raid dramatically calmer.
- Hunt the tool cupboard. A tool cupboard has 100 HP and dies to a single satchel. Find it early and the defenders lose the ability to repair anything behind you.
- Soften, then shoot. Three satchels plus a burst of explosive 5.56 is often cheaper than the fourth satchel on a sheet metal door, and much quieter.
- Carry them in one slot. Satchels stack to 10 against C4’s five. A whole door raid fits in a single inventory slot, which leaves room for meds and ammo.
- Farm rope passively. Never make a special trip for rope. Break barrels on the way to and from your sulfur nodes and you will always have enough.
- Recycle spares before a wipe. A satchel recycles back into two beancan grenades, so leftovers are not a total loss if your raid gets called off.
- Raid early. Satchels are strongest in the first days of a wipe, when bases are wood and stone and nobody has armored anything yet. By day ten the window has closed.
Rust Satchel Charge FAQ
How much sulfur is a satchel charge in Rust?
What is the satchel charge recipe in Rust?
How much gun powder is one satchel charge?
How many satchels for a stone wall?
How many satchels for a sheet metal door?
How many satchels for a garage door?
How many satchels for an armored door?
How many satchels for a sheet metal wall?
How do you get the satchel charge blueprint in Rust?
Why did my satchel charge not explode?
How many satchels for an auto turret?
Do satchel charges stack in Rust?
Are satchels or C4 better in Rust?
What workbench do you need for satchel charges?
Do satchel charges carry over a wipe?
Final Thoughts
The satchel charge is the most honest item in Rust. It is cheap, it is unreliable, it only really works on doors, and it never pretends otherwise. Players who fight that and try to blow open sheet metal walls with a stack of them come away convinced satchels are useless. Players who accept it and use them the way the item description says come away with other people’s loot.
Learn the four numbers that matter: two for a wooden door, four for a sheet metal door, two for a turret, one for a tool cupboard. Keep rope in your base, throw everything a target needs before the first one goes off, and never panic next to a dud. Do that and 480 sulfur becomes the best value in the game.
Sources
- Crafting recipe, workbench level, craft time, stack size, despawn timer and research cost: Facepunch Rust Wiki, Satchel Charge and Beancan Grenade
- Tech tree cost, recycler output and seismic sensor detection: RustHelp, Satchel Charge
- Dud behaviour, blast radius and raiding noise: Corrosion Hour, RUST Satchel Charge
- Raid counts and per target sulfur costs: our own Rust raid calculator and Rustly Raid Calculator
- Explosives ignore the soft side and hard side distinction: Rustafied, Raiding in Rust
- Stone wall satchel count cross check: RustHelp, Stone Wall
- The game itself: Facepunch Studios
