
Rust armor is the difference between winning a gunfight and respawning on the beach. It is not one item you equip, it is a set of clothing slots you fill, and the right combination lets you tank AK rounds, shrug off a spear, walk through a radiation zone or hold a doorway against a raid. Get the pieces wrong and you are a naked with extra steps. Get them right and a duo can wipe a group twice their size.
The tricky part is that Rust armor has changed a lot. The old advice of “just wear a metal facemask and chest plate” is still solid, but two updates rewrote the meta: armor inserts arrived in 2025 and let you tune your protection with craftable plates, and the June 2026 Built Different update dropped a loot-only ballistic armor set that beats anything you can craft. Most guides you will find have not caught up. This one has.
Below you will find every armor slot explained, the exact protection numbers for every piece, and the best armor combinations for wipe day, mid game roaming, late game PvP and base defense, plus how inserts and ballistic gear fit in. Every stat here is cross checked against the Facepunch wiki, RustClash, Corrosion Hour and Rustafied so you can trust the numbers before you sink leather and HQM into a kit.
- How Armor Works
- Armor Slots
- Best Combinations
- Protection Chart
- Metal Armor
- Road Sign Armor
- Wood & Bone
- Armor Inserts
- Ballistic Armor
- Heavy Plate
- Hazmat & Radiation
- Skins
- The One Combo
- FAQ
How Rust Armor Actually Works
Before you pick a combination, you need to understand what the numbers mean. There is no single armor stat in Rust. Instead, every clothing item reduces incoming damage by a percentage, and it does so per body area and per damage type. A metal chest plate protects your torso, not your head. A facemask protects your head, not your legs. Damage that hits an unarmored area ignores your armor entirely, which is exactly why headshots are so deadly: they hit the head slot, so only your helmet or facemask matters.
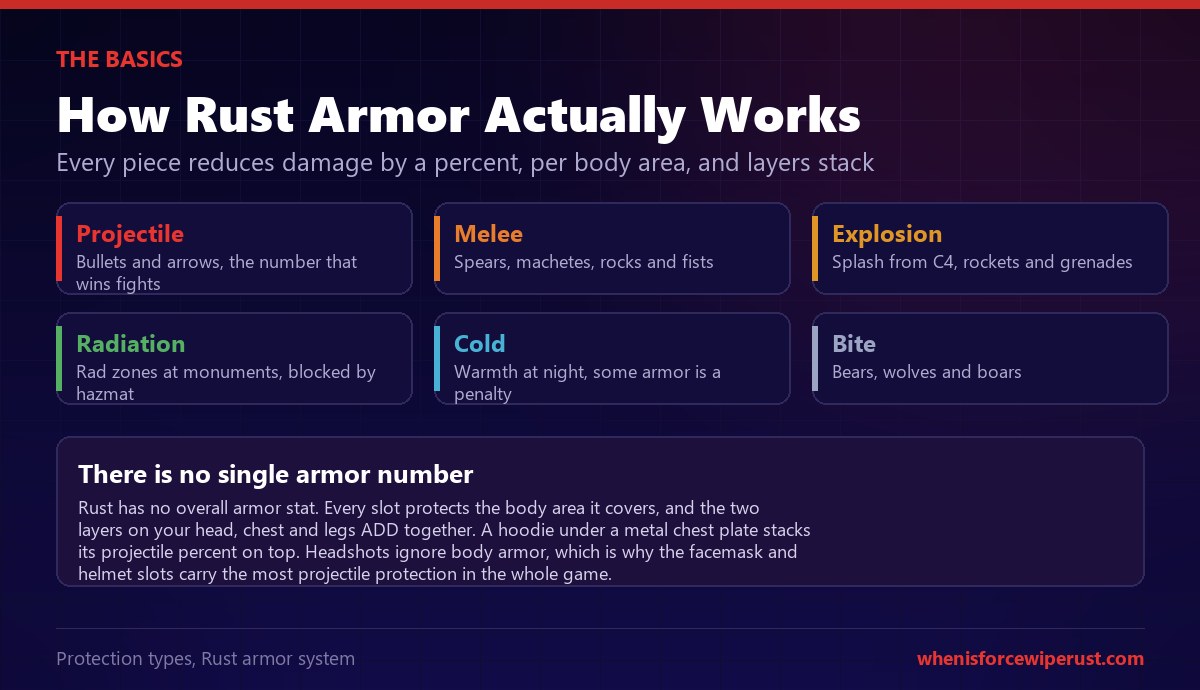
Each piece carries up to six protection values:
- Projectile is bullets and arrows. This is the stat that decides gunfights, so it is the one to prioritise on your head and chest.
- Melee covers spears, machetes, rocks and fists, which matters far more early game and in close raids than people expect.
- Explosion reduces splash from C4, rockets and grenades, though note that raiding damage to structures ignores your armor.
- Radiation keeps you alive in monument rad zones. The hazmat suit is king here.
- Cold keeps you warm at night. Some heavy armor is actually a cold penalty, so a metal kit can leave you freezing.
- Bite is animal damage from bears, wolves and boars.
The single most important mechanic is layering. Your head, chest and legs each have two clothing layers, and the protection of both layers adds together. A hoodie under a metal chest plate stacks its 20% projectile on top of the plate’s 25%. This is why a good Rust armor combination is never one piece, it is a full stack of layered clothing.
Rust Armor Slots Explained
You have five equipment areas. Three of them (head, chest, legs) take two layers each, and two of them (hands, feet) take a single item. Understanding Rust armor slots is what separates players who wear one facemask from players who build a full 45% projectile chest out of two stacked pieces.
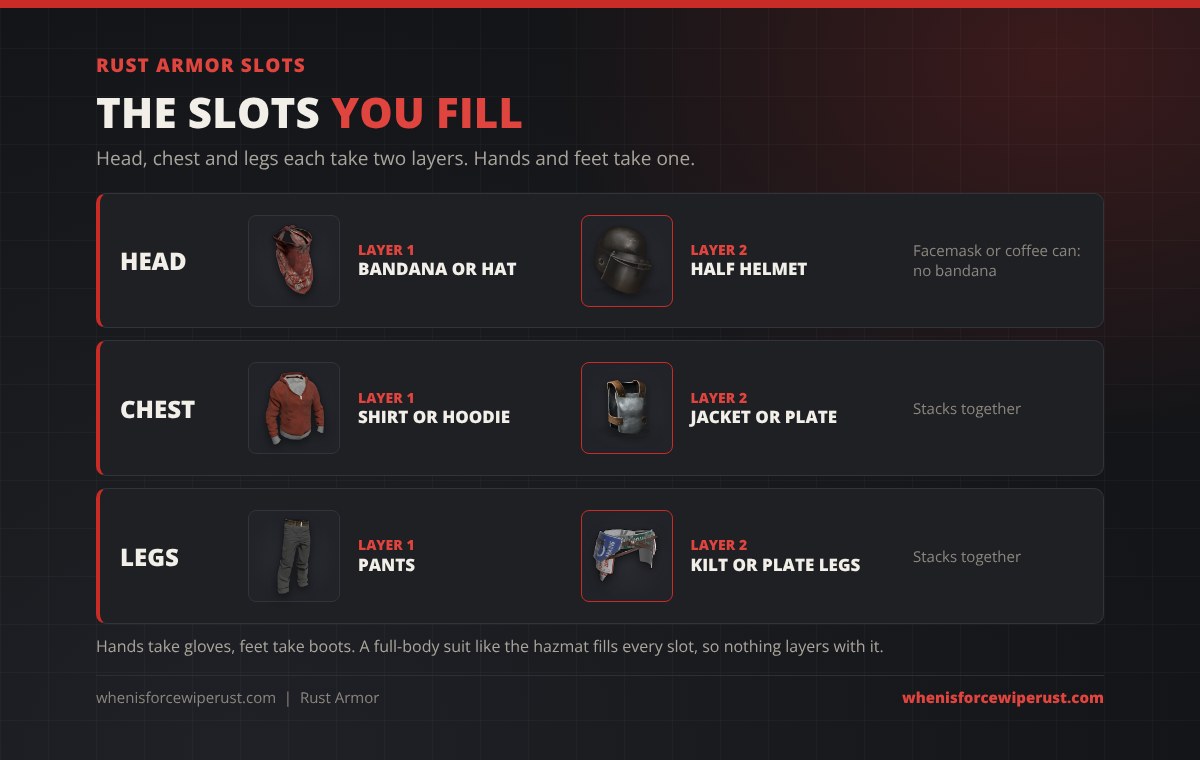
| Area | Layer 1 (under) | Layer 2 (over) |
|---|---|---|
| Head | Hat or bandana | Half helmet (riot, bucket, wolf), or a facemask on its own |
| Chest | Shirt, hoodie, BDU shirt | Jacket, chest plate, vest |
| Legs | Pants, shorts, BDU pants | Kilt, plate legs |
| Hands | Gloves (one slot) | |
| Feet | Boots (one slot) | |
Best Armor Combinations for Every Stage of the Wipe
Here is the part you came for. The best armor in Rust depends entirely on where you are in the wipe and what you are doing. A wipe-day kit and a base-defense kit are completely different animals. These are the combinations worth building, ranked by the head projectile number they reach, because head protection is what keeps you alive in a rifle fight.
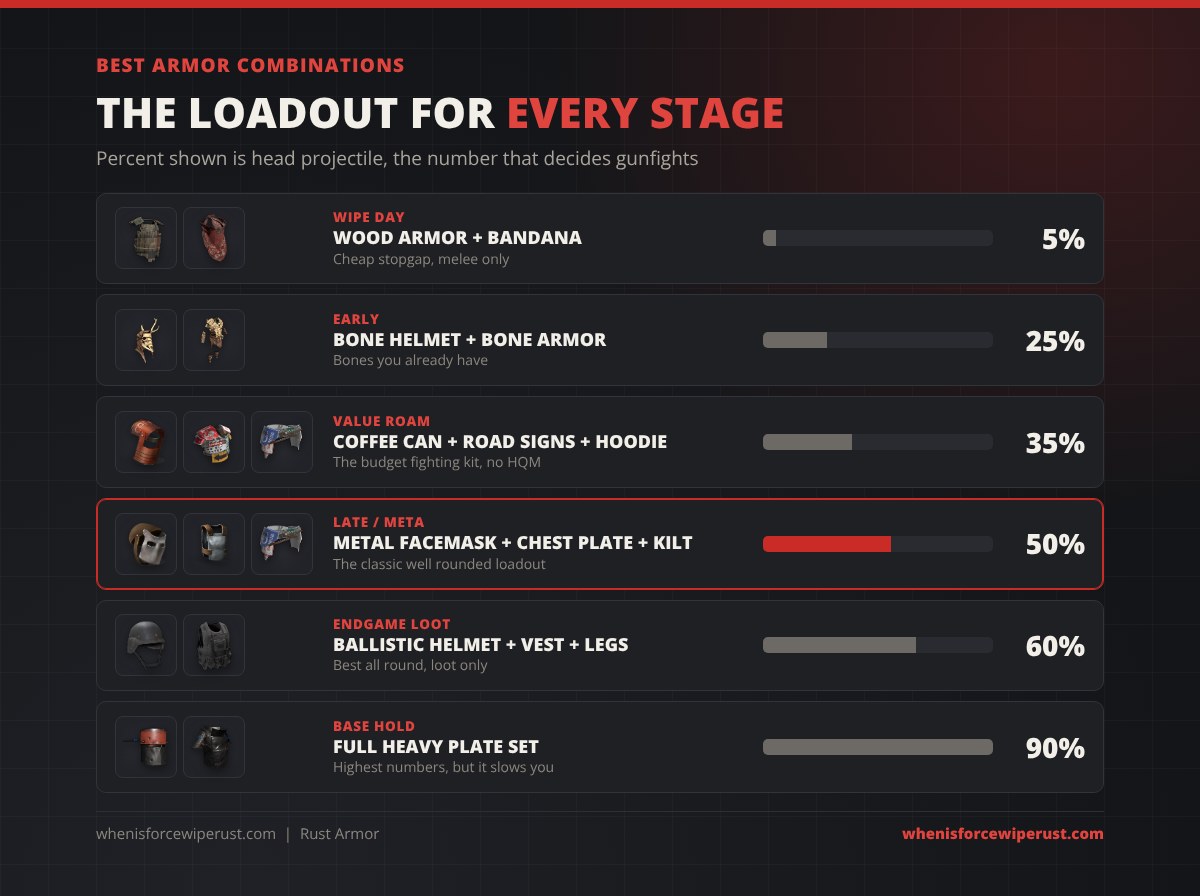
| Stage | Combination | Head projectile | Why |
|---|---|---|---|
| Wipe day | Wood Chestplate + Bandana + Boots | ~5% | Cheap melee stopgap, no real bullet defense |
| Early game | Bone Helmet + Bone Armor | 25% | Uses bones you already farm, covers torso and head |
| Value roam Best value | Coffee Can + Road Sign Jacket + Kilt + Hoodie | 35% | No HQM needed, still eats AK rounds |
| Late / meta Best craft | Metal Facemask + Chest Plate + Road Sign Kilt | 50% | The classic well-rounded fighting loadout |
| Endgame Loot only | Ballistic Helmet + Vest + Leg Armour | 60% | Best all-round protection, must be looted |
| Base hold | Full Heavy Plate set | 90% | Highest numbers in the game, but it slows you |
The head projectile figures above are just the helmet or facemask slot. Once you layer a hoodie and pants under your chest and leg armor, your real chest and leg protection climbs another 15–25%. A bandana adds 5% to the head, but only under a half helmet like the Riot Helmet, Bucket Helmet or Wolf Headdress; the game blocks it with a Metal Facemask or Coffee Can Helmet. That stacking is why the difference between a lazy one-piece player and a fully-kitted one is enormous, even when they are wearing the “same” armor.
Rust Armor Protection Chart
This is the master reference: the exact protection values for the armor pieces that matter, straight from the current game data. Projectile is the headline number, but the full spread tells you where each piece shines. All values are percentages of damage reduced.
| Piece | Slot | Projectile | Melee | Explosion | Cold |
|---|---|---|---|---|---|
| Heavy Plate Helmet | Head | 90% | 80% | 17% | -17% |
| Ballistic Helmet Loot | Head | 60% | 70% | 13% | -3% |
| Metal Facemask | Head | 50% | 70% | 8% | -4% |
| Coffee Can Helmet | Head | 35% | 50% | 8% | 0% |
| Bone Helmet | Head | 25% | 40% | 7% | 0% |
| Heavy Plate Jacket | Chest | 75% | 70% | 17% | -17% |
| Ballistic Vest Loot | Chest | 35% | 20% | 3% | -3% |
| Metal Chest Plate | Chest | 25% | 20% | 0% | -8% |
| Bone Armor | Chest | 25% | 40% | 7% | 0% |
| Road Sign Jacket | Chest | 20% | 25% | 0% | -8% |
| Hoodie (L1) | Chest | 20% | 15% | 0% | 8% |
| Wood Chestplate | Chest | 10% | 40% | 5% | 0% |
| Heavy Plate Pants | Legs | 75% | 70% | 17% | -17% |
| Ballistic Leg Armour Loot | Legs | 30% | 40% | 3% | -3% |
| Road Sign Kilt | Legs | 20% | 25% | 0% | -8% |
| Hazmat Suit | Full body | 30% | 30% | 5% | 8% |
Two things jump out. First, the Metal Facemask at 50% projectile is the best head protection you can craft, and nothing else you build comes close. Second, the negative cold values on metal and road sign gear are real: a full metal kit will have you freezing at night, which is why a hoodie under-layer (which adds warmth) is not optional.
Metal Armor: The Classic Kit
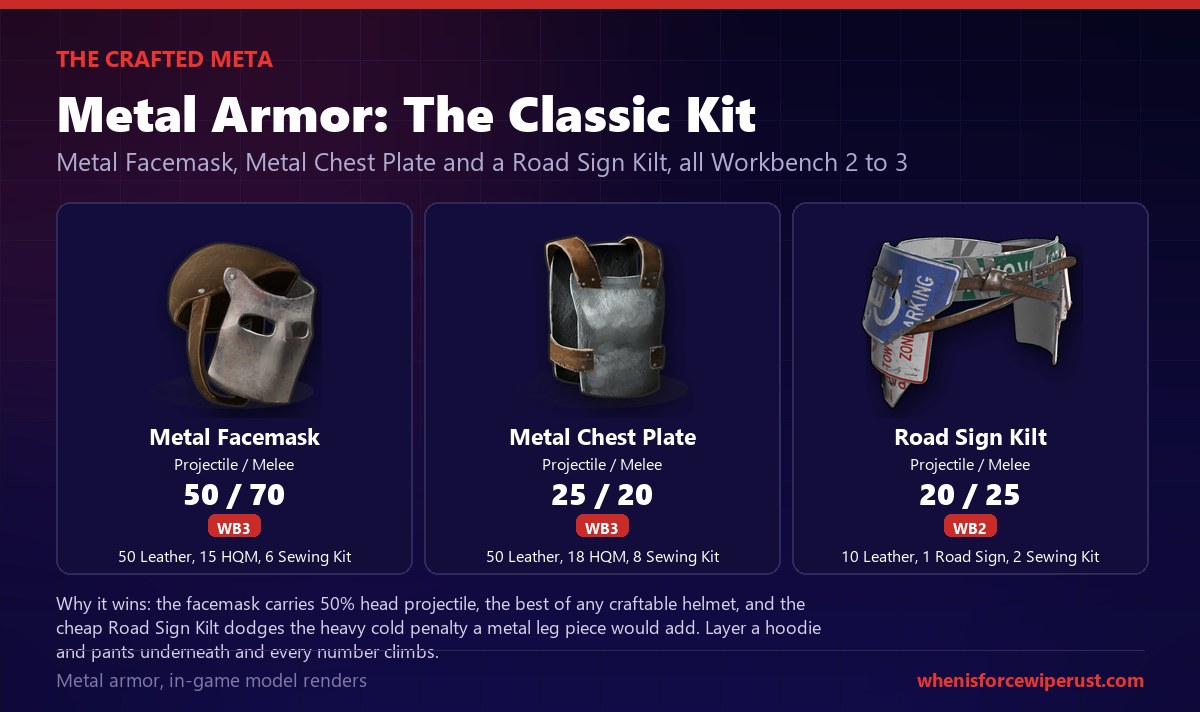
When Rust players say “full metal,” they mean the Metal Facemask and Metal Chest Plate. This is the backbone of the late-game fighting kit and has been the standard for years. It requires Workbench 3, High Quality Metal and a stack of sewing kits, so it is a real investment, but the payoff is the best craftable head protection in the game.
| Piece | Protection | Craft cost | Workbench |
|---|---|---|---|
| Metal Facemask | 50% proj / 70% melee | 50 Leather, 15 HQM, 6 Sewing Kit | WB3 |
| Metal Chest Plate | 25% proj / 20% melee | 50 Leather, 18 HQM, 8 Sewing Kit | WB3 |
| Road Sign Kilt | 20% proj / 25% melee | 10 Leather, 1 Road Sign, 2 Sewing Kit | WB2 |
The reason the meta loadout pairs metal on the head and chest with a Road Sign Kilt on the legs, rather than metal everywhere, is cold. Metal leg pieces stack a heavy cold penalty, and the road sign kilt gives you nearly the same projectile protection for a fraction of the cost and less freeze. Layer a hoodie under the chest plate and pants under the kilt and this becomes one of the most balanced kits in the game. It is what most experienced players run for roaming and PvP once they are established. You will need a lot of leather and HQM, so a trip to farm scrap and recycle for components, or a run at a monument, usually comes first.
Road Sign Armor: The Best Value Kit
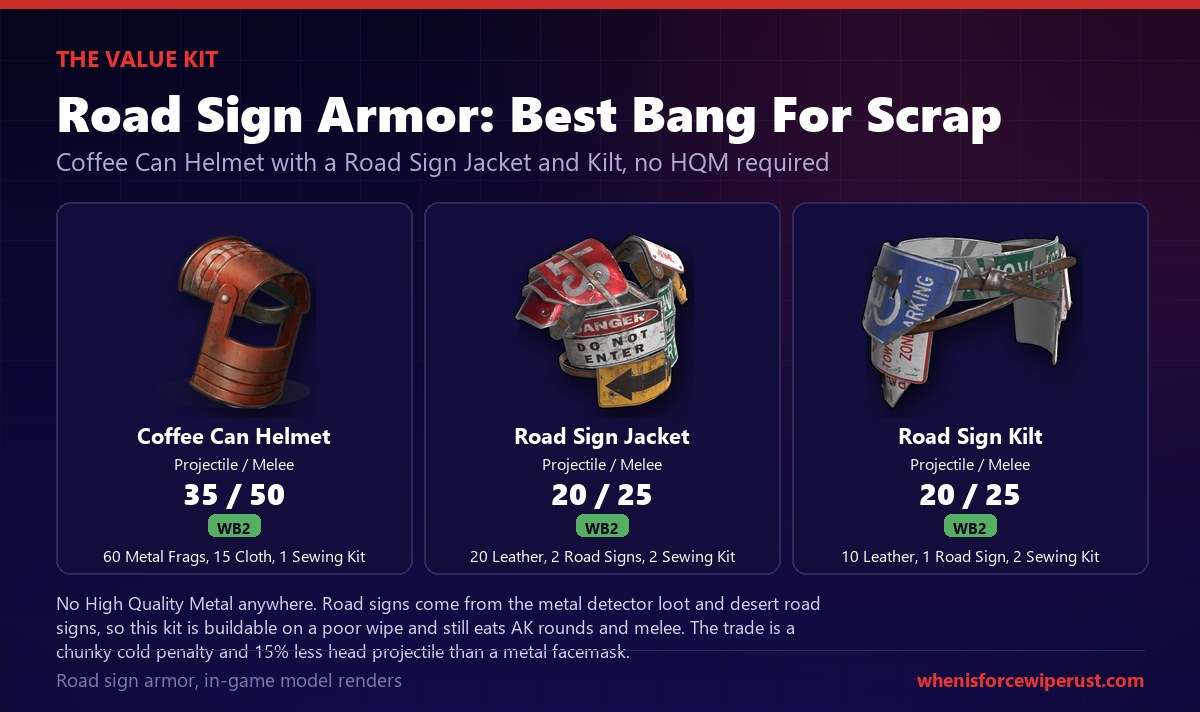
If metal is the meta, road sign armor is the value pick, and on a rough wipe it is often the smarter choice. The kit is a Coffee Can Helmet, Road Sign Jacket and Road Sign Kilt, and its killer feature is that it needs no High Quality Metal at all. Road signs come from roadside metal-detector loot and desert junk piles, and the whole set crafts at Workbench 2.
| Piece | Protection | Craft cost | Workbench |
|---|---|---|---|
| Coffee Can Helmet | 35% proj / 50% melee | 60 Metal Fragments, 15 Cloth, 1 Sewing Kit | WB2 |
| Road Sign Jacket | 20% proj / 25% melee | 20 Leather, 2 Road Signs, 2 Sewing Kit | WB2 |
| Road Sign Kilt | 20% proj / 25% melee | 10 Leather, 1 Road Sign, 2 Sewing Kit | WB2 |
The trade against full metal is two-fold: the Coffee Can Helmet gives 35% head projectile versus the facemask’s 50%, and road sign gear carries the same nasty cold penalty. But for the cost, this kit punches far above its weight, and plenty of PvP players run road sign all wipe simply because it is cheap enough to not care when you lose it. Losing a road sign kit to a lucky bolt shot stings a lot less than losing full metal.
Early Game Armor: Wood and Bone
On wipe day and the first hours after, you are not making metal anything. Your goal is cheap melee protection so you survive spear pokes and rock fights while you gather. Two options matter here.
Wood armor (Wood Chestplate, helmet, pants) is dirt cheap and crafts with no workbench at all, from wood plus a little cloth or rope. Its projectile protection is minimal (10% on the chest), but its 40% melee is genuinely useful in the opening melee scramble. Treat it as a wipe-day stopgap, not a fighting kit.
Bone armor (Bone Helmet and Bone Armor) is the early-game upgrade. Both pieces hit 25% projectile and 40% melee, crafted from cloth and bone fragments you get from harvesting animals. Bone armor covers your head and torso for almost nothing, and it is the natural step up before you have the leather and workbench for road sign gear. The catch is it leaves your legs bare, so a lucky leg shot still hurts.
Armor Inserts: The Upgrade Most Guides Miss
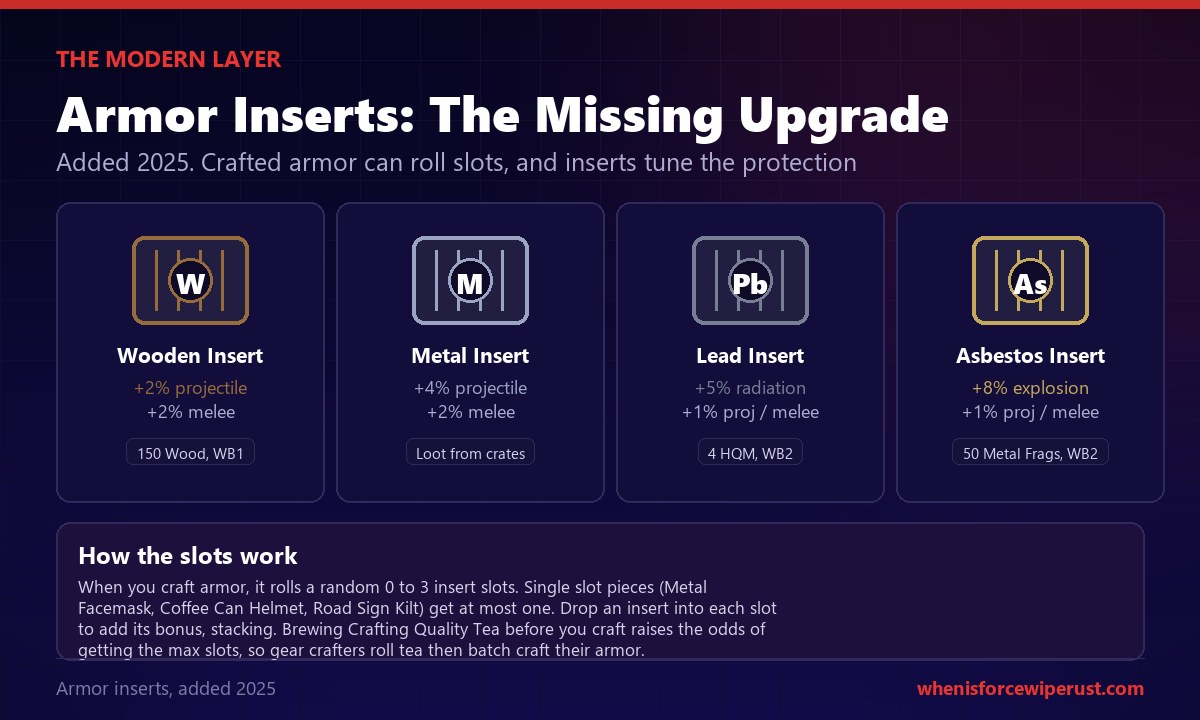
This is the part almost every older Rust armor guide gets wrong, because it did not exist until 2025. Armor inserts let you tune the protection of your crafted armor. When you craft an eligible armor piece, it has a chance to roll with 0 to 3 insert slots, and you drop an insert into each slot to add its bonus. The bonuses stack, so three metal inserts on a chest plate is a meaningful projectile bump.
| Insert | Bonus (per insert) | How to get | Workbench |
|---|---|---|---|
| Metal Armor Insert Loot | +4% projectile, +2% melee | Loot from crates only | – |
| Wooden Armor Insert | +2% projectile, +2% melee | Craft: 150 Wood | WB1 |
| Lead Armor Insert | +5% radiation, +1% proj/melee | Craft: 4 HQM | WB2 |
| Asbestos Armor Insert | +8% explosion, +1% proj/melee | Craft: 50 Metal Fragments | WB2 |
The Metal Armor Insert is the best for combat at +4% projectile, but you cannot craft it, only loot it. The Wooden insert is the craftable projectile option. The Lead insert is a radiation booster (handy for cutting a hazmat trip short), and the Asbestos insert adds explosion resistance. Note that single-slot pieces, specifically the Metal Facemask, Coffee Can Helmet and Road Sign Kilt, can only ever roll one slot, while jackets, chest plates and suits can roll up to three.
Ballistic Armor: The New Best Armor in Rust
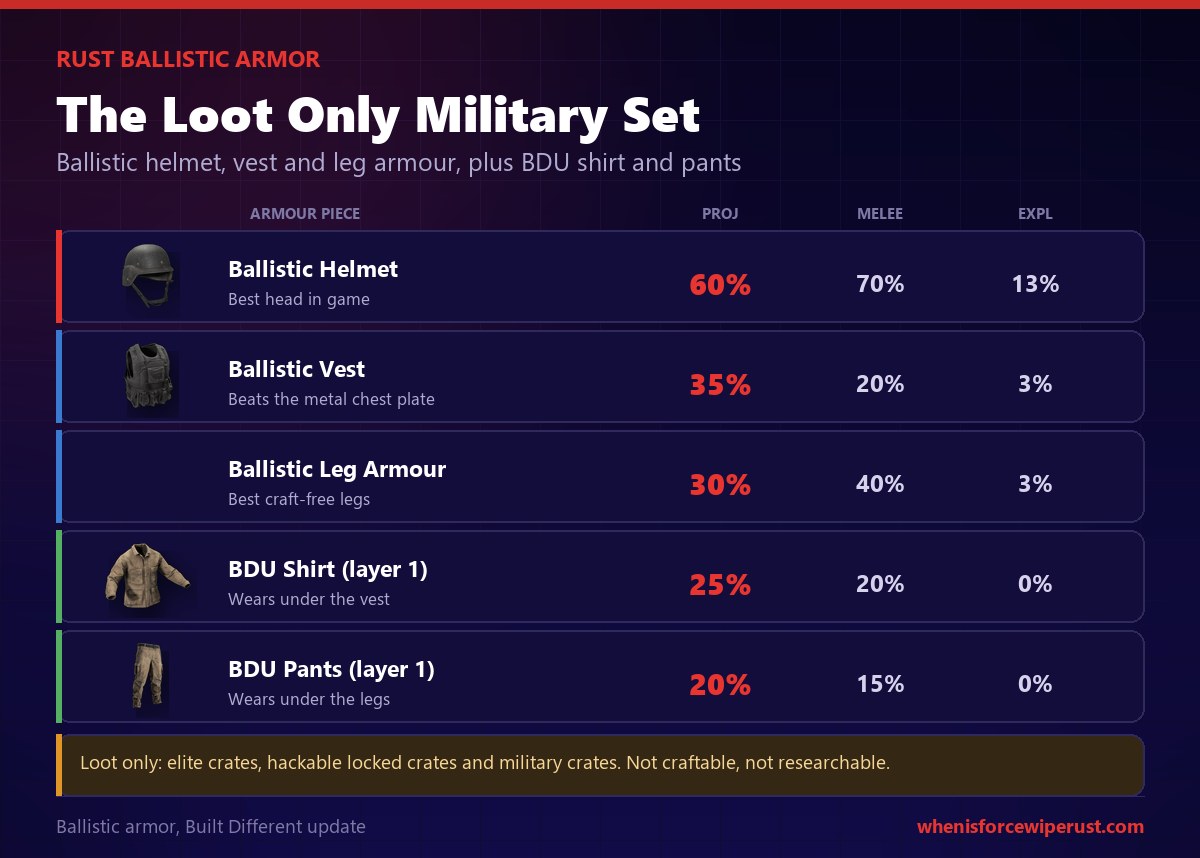
The June 2026 Built Different update added the first armor that beats a full metal kit, and it changed the answer to “what is the best armor in Rust.” The ballistic armor set is a loot-only military kit: Ballistic Helmet, Ballistic Vest and Ballistic Leg Armour, plus the BDU shirt and pants that layer underneath.
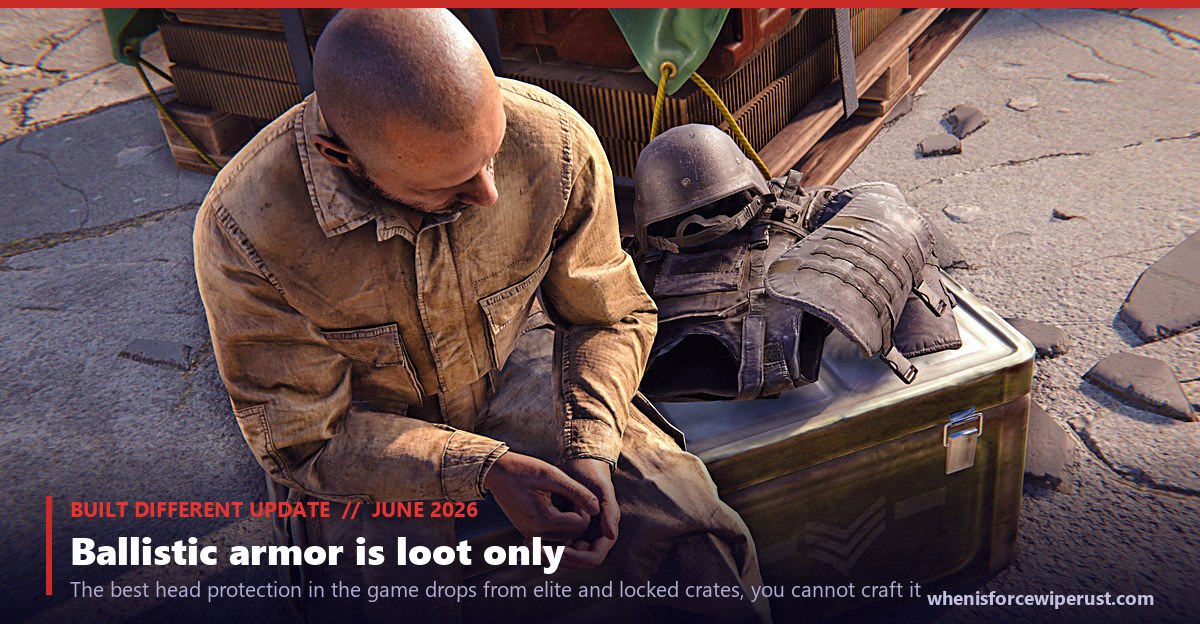
The headline is the Ballistic Helmet at 60% projectile, which beats the metal facemask’s 50% and behaves far better in the cold (a mild -3% versus the facemask’s -4%, and none of the heavy-plate freeze). The Ballistic Vest at 35% projectile edges out the metal chest plate, and the Ballistic Leg Armour gives you strong legs with no crafting at all. The BDU shirt and pants layer under the vest and legs to push your totals even higher.
Heavy Plate Armor: The Base Holder
Heavy plate armor (Heavy Plate Helmet, Jacket and Pants) has the highest protection numbers in the entire game: 90% projectile on the helmet and 75% on the body pieces. On paper it is unbeatable. In practice it is a specialist tool, not a roaming kit.
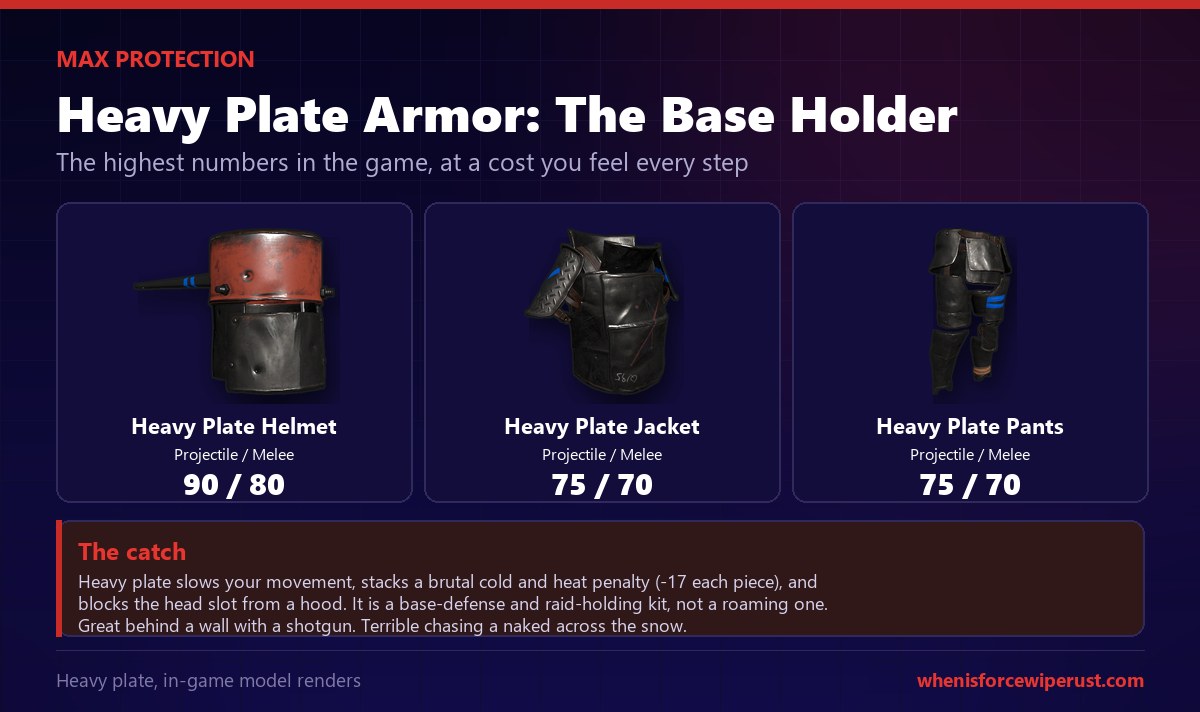
The catch is severe. Heavy plate slows your movement, stacks a brutal cold and heat penalty (-17% each piece), and the helmet blocks you from wearing a hood. That makes it miserable for chasing anyone or crossing open ground, but excellent for one job: holding a doorway during a raid. Sat behind a wall with a shotgun, a heavy-plate defender is extremely hard to kill. If you are the one being raided, heavy plate buys you time. If you are roaming the map, leave it at home.
Hazmat and Radiation Protection
Armor and radiation are two different problems. When you run irradiated monuments, projectile protection barely matters, radiation protection does. The Hazmat Suit gives 50% radiation as a full-body suit, which is enough for almost every monument, but remember it fills every slot, so you have no facemask or chest plate while wearing it.
The smart play is to carry both: run your fighting kit normally, and swap to a hazmat only for the deep, hot rooms at places like Military Tunnels or the Missile Silo, then swap back. For milder rad, a road sign kit plus a couple of Lead Armor Inserts can cover you without giving up your armor at all, which is a genuinely modern option most guides never mention.
Do Armor Skins Change Stats?
No. This comes up constantly, so it is worth being blunt: armor skins in Rust are purely cosmetic. A skinned metal facemask has the exact same 50% projectile as a default one. Clothing and armor skin sets change how your gear looks, nothing more. They are a fun way to personalise a kit or intimidate, but never pay for a skin expecting a stat advantage, because there isn’t one. The protection comes from the item, not the skin on it.
The One Armor Combo to Learn
If you take one thing from this guide, make it this. For the vast majority of your Rust life, the combination that keeps you alive without slowing you down or bankrupting you is the crafted meta.
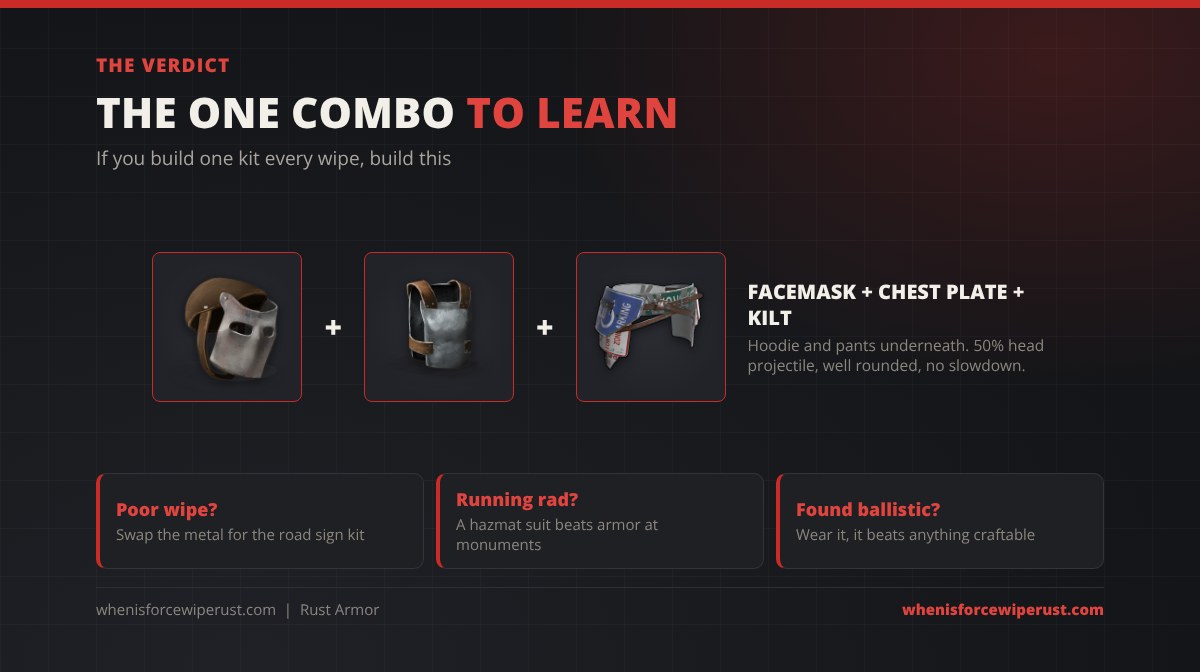
Metal Facemask + Metal Chest Plate + Road Sign Kilt, with a hoodie and pants layered underneath. It reaches 50% head projectile, keeps your torso and legs strong, and does not carry the movement penalty of heavy plate. From that baseline you make three simple swaps: drop to road sign armor on a poor wipe, throw on a hazmat when you run radiation, and wear ballistic gear over the top whenever you loot it. Master that one kit and its swaps and you will out-gear most of the server.
Your armor, and everything to make it, vanishes on force wipe. Every facemask, chest plate and stack of HQM goes in the bin on wipe day, along with your blueprints on most servers. Know exactly how long you have to gear up and use it.
See the wipe countdownRust Armor FAQ
What is the best armor in Rust?
What is the best armor combination in Rust?
Does armor actually matter in Rust?
How do Rust armor slots work?
What are armor inserts in Rust and how do you use them?
What is the best armor insert?
How do you get ballistic armor in Rust?
Is ballistic armor better than metal armor?
Is road sign armor good in Rust?
What is the best helmet in Rust?
What is the best tier 2 armor set in Rust?
Does the hazmat suit count as armor?
Is heavy plate armor worth it?
Do armor skins change your protection in Rust?
Sources
- RustClash: Wearable database for the exact projectile, melee, bite, radiation, cold and explosion values of every armor piece.
- Facepunch wiki: Clothing Slots for the two-layer slot system and full-body suit behavior.
- Facepunch: Built Different update (June 2026) for the loot-only ballistic armor and BDU set.
- Rustafied: Built Different update for the ballistic and BDU protection values and crate sources.
- Corrosion Hour: Armor Inserts Guide for the insert types, bonuses and slot mechanics.
- Facepunch wiki: Metal Facemask and Coffee Can Helmet for the verified craft costs and workbench levels.
- Facepunch wiki: Heavy Plate Helmet for the movement penalty and craft cost.